AAAARRRGHHHHHHHHHHHHHH!!!!
Never again!!!!
 |
| My home made beer wort chiller in place in my brewing boiler/copper |
After posting in part 1 of my
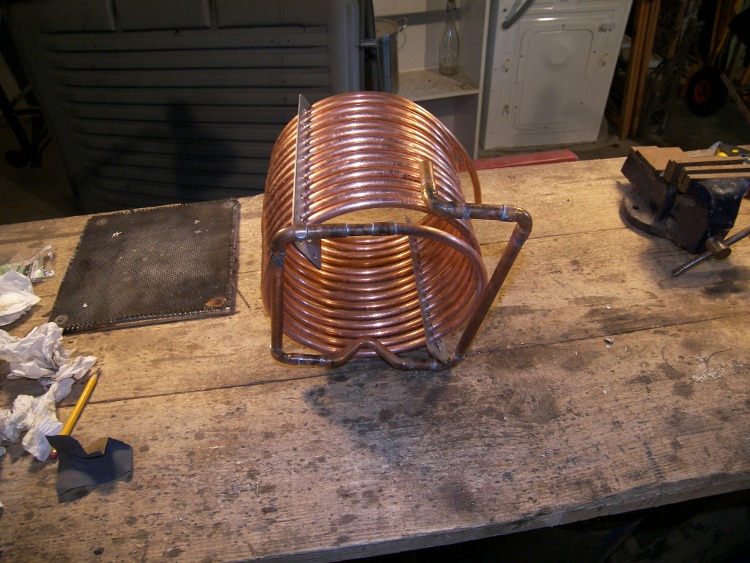
home made wort chiller build, how easy the bending of the coil had been I then started fabricating a couple of strips with holes drilled in to act as a spacer for the coils to keep each coil about 10mm apart from its neighbours...
 |
| The first few coils went well but then... FFFFUUUUUU!!!1!! |
Imagine trying to simultaneously thread 15 needles with rigid thread and that's about the sheer, bloody buggeryness of it. So after the best part of three hours (including several swearing breaks) I ended up with this.
 |
| Immersion chiller coils threaded into vertical spacer bars. Urgh! |
I have no idea if this was needed to be honest but my thinking is there's a larger surface area of chilled copper pipe exposed to the hot wort this way. Unsupported the weight of the coil squashes each coil flat down onto the one below. Lesson learned though for next time (AAARGGHHH) drill larger holes - I could only go up to 10mm as none of my drills will take a larger bit and then had to ream the holes to about 11mm which was hard work enough... Meh!
Anyway, it's finished bar the water connections... probably just hose clip the water pipe for this first brew directly onto the copper pipe stubs.
So here's a few piccies and even though it's an hour before what is typically, "aperitif" time I'm off to crack open a cold Perlenbacher!
After ageing several months fitting the support bars to my copper coil, I began assembling the rest of the wort chiller. My design idea was to have a stable base that is a part of the coolant circuit but avoid any contact with the hop filter in the bottom of the brewing boiler/copper.
 |
| Some bits of pipe badly soldered together. |
After countless hours of plumbing during the renovation of our house I have become reasonably good at soldering. Maybe not the best looking soldering but 99% leak free, which is nice.
 |
| The base unit joined up with the cooling coil, note the bend in the pipe (the bit touching the bench)... |
 |
| And stood up! pretty stable so far. It's starting to look like a wort chiller. |
If you noticed the bend/kink in the base pipework in the last but one photo, it's there to bridge the hop filter that is fitted into the base of my brewing boiler/copper without touching it and possibly blocking some holes. You can see it doing its thing below.
 |
| Wort chiller base avoiding contact with the hop filter (centre) |
All in all this has been the toughest project to date in the building of my brewing equipment but for me the benefits of full mashed, all grain home brewed beer makes it worth it. Having a plumber mate has certainly helped keep the cost down and I reckon the whole wort chiller has cost less than 30 quid.
 |
| My home made, immersion wort chiller in place in my brewing boiler. |
If you missed it you can follow this link for Part 1 of
building my own wort chiller.


4 comments:
Well done on the wort chiller, I can just imagine your fuming, trying to get that coil through all those holes in the spacer plates but it looks like it was worth the effort.
Cheers Chris, it was indeed a pig of a job but the chiller has performed superbly on my first three all grain brews. The latest one hasn't been posted yet... An Extra Dark Stout coming soon!
Fellow brewer from the US. I liked the structure of your chiller so much that I made a ver similar version. I used 20' of 1/2 " flexible copper with rigid verticals soldered on. I siphon my brews so I didn't need the base you have on yours. The big takeaway was using the aluminum supports. I installed 3 of them on mine. I love the stability and spacing they provide. I took your advise and drilled the holes in the aluminum with a 9/16" bit, making it much easier to thread the 1/2" tubing. I was couroious if you had any corrosion with the aluminum? Guru John Palmer wrote an article for BYO magazine about metals and had this to say " Aluminum will corrode if placed adjacent to another metal like copper in wort or beer, but the short contact time during a typical brewday is not a problem." Thanks again for posting your build, much appreciated. I'm glad I stumbled along your blog, very entertaining and informative. - Corey in Iowa
Hi Corey, thanks for the comment and I'm very pleased to read that you've enjoyed my blog and built a similar wort chiller. With regard to corrosion, I've seen no sign of any as yet and like you mention above, put this down to the relatively short exposure time.
I've done several brew days since my last post but haven't gotten around to posting them yet. I must get myself back in gear and update this blog.
Post a Comment