Showing posts with label wort. Show all posts

Friday, September 2, 2011

All Grain Brew #2 - Courage Directors

Since my first brew day and the lessons learned then I have upgraded some of my equipment before brewing again. This time, everything went like a dream and was a lot more relaxed and enjoyable than my first brew day - possibly this was also due to somewhat knowing what to expect this time around.

Brewing Equipment Upgrades:
Additional insulation to my Mash Tun
New 9.2kW Gas Burner (3 valve taps)
Modified sparging device - Original was fitted in the lid which made it awkward to see it in order to adjust the flow rate.

I was very happy with the performance of all my home made stuff, especially the mash tun this time around. Only 1C temperature loss over a 90 minute mash. The other star of the day was my homemade Wort Chiller - I fired it up to get the boil down to 80 to add the post boil hops, before I had chance to fill in my brewing record and grab the thermometer to check it was close to 80, the temp had been brought down to 70C! Less than 3 minutes!!!!!

Anyway, on with the brew... it was a later start than I'd planned thanks to some boring, work stuff (I'm supposed to be on holiday).

Courage Directors from Graham Wheeler's superb Brew Your Own British Real Ale a book I can't put down or recommend highly enough.

Target volume 23l - I only ended up with 20l so there was more lost during boil than allowed for. I didn't top up this time, the gravity was a little higher than target but I decided to leave it alone - one of my biggest mistakes on brew 1 was to top up the post boil hopped wort with freshwater... This brew may be stronger than the recipe suggests or it may be a bit sweeter if the excess sugar is fermented out but I'm just going to wait and see.

Target OG 1046 - Actual reached 1050 (I still don't know how to calculate brew house efficiency)
Grain Bill - Maris Otter Pale Malt, Crystal Malt & Black Malt
10:00 As well as the above mentioned malted grains the recipe called for Target bittering hops and Styrian Goldings post boil aroma hops. Irish Moss copper finings and BruPaks Top Fermenting Ale Yeast which I re-hydrated and started off with a little of the wort from the first runnings of the mash. (It was going like the clappers by the time came to pitch the yeast later that day)

HLT coming up to 75C for the mash.
11:30 This time I heated the liquor in the HLT to 75C and preheated the mash tun with a kettle full of boiling water.
Transferring 10.3/10.4 litres hot liquor (water) to the mash tun - fitted in the PU foam insulated box
11:40 I got my strike temp in the mash tun after hot liquor transfer at 72C which was about what I was aiming for. After the addition of the malted grains and doughing in the mash temp was bang on 67C that I was aiming for.
Doughing in the grains and hot liquor in the mash tun.
pH test strip showed 6 (possibly 6.5) after a couple of minutes and just prior to putting the lid on.

11:45 - 90 minutes mash time gave me time to go into the office and get some work done. I was really pleased to find the mash temperature had only dropped to 66C in the 90 minutes and the smell, on removing the mash tun lid was awesome!

13:15 Running off the sweet wort. It quickly got darker than it looks above.
13:15 As before, the first run off was a tad cloudy and contained a few bits of debris but I was ready for it this time, caught it in a jug and returned it to the mash tun. The filter bed established quickly and after maybe a litre and a half in the jug I began to run the wort off into the brewing copper.

New sparge system in place and connected to the HLT
13:20 While the sweet wort was running off into the copper I set up the modified sparge system (shown above seated on the top lip of the mash tun) and heated the sparging liquor in the HLT to 80C

Beginning to sparge the mash bed. Gorgeous colour and the smell was fantastic!
13:30 Began sparging the mash bed with liquor at 80C. The new version of the sparging system worked well but need a bit of help to keep it level to ensure the hot liquor flowed out of all the holes around the tube matrix to cover the grain bed surface area. My mash tun just rests on a chair for now and is slightly off level. Run off temp of the sparged wort was 60C.

13:55 Finished the sparge as the run off (now 58C) was no longer tasting sweet and was virtually colourless. Total wort volume ready for the boil, 22.5 litres. I topped this up to 30l with the remaining liquor from the HLT and got ready for the boil.
30l wort in the copper and approaching the boil. Break material forming.
The new gas burner again came into its own for the boil. Starting temp of the sweet wort was 58C and a vigorous rolling boil was achieved in 30 minutes! Brew 1 took almost an hour to begin boiling and never actually reached a proper rolling boil.
14:20 Rolling boil and the hot break begins.
14:20 There was a lot of things happening very quickly once the rolling boil began. I had to adjust the burner quite a bit for the first 10 minutes or so to avoid a boil over. The break material on the top came very close to the brim of the copper - even before I'd added the bittering hops. Having read that the hop addition can cause a big surge in the surface activity I waited a few minutes for things to calm down a little before adding them.
14:23 Bittering hops added. The effect was minimal the surface of the boil behaved.
14:23 26g of Target hops added to the boil. Totally expecting a big surge in the surface activity and further scrabbling to adjust the burner I was surprised that not a lot happened when the hops went in. The break material head (not really sure what it's called) rose up a little but settled quickly.


As you can see in the video above the rolling boil was definitely rolling this time. I got nothing close to this on brew 1. For the most part the burner wasn't on full power either, the outer burner rings turned to about 50% and the inner ring around 65-70%

15:40 Wort Chiller placed in the boiling wort, 15 minutes before the end of the boil.
15:40 Wort chiller placed into the copper - The boiling wort sterilizes the copper coils of the immersion chiller.

15:45 Irish Moss copper finings added with just ten minutes of boil time remaining. 

15:55 Boil finishes and the wort chiller is turned on. Cold water runs through the chiller and via heat exchange begins to lower the temp of the boiled, hopped wort to 80C for the addition of post boil, aroma hops (Styrian Goldings) and then further still, after a rest to allow the hops to soak a while in the still hot but not boiling wort, to get the temp ready for pitching the yeast (between 20C and 30C).
Aroma Hops added at 70C - The chiller worked so well the temp whizzed past my target 80C in the time it took me to make a few notes and rinse the thermometer... Almost 30 degrees in 3 minutes ish.
The first water out of the chiller was hot enough to fill the sink for washing up and the mash tun for washing it out but quickly cooled. The remaining "waste" cooling water barely filled 3 watering cans so the actual amount of wasted water is quite low. My homemade wort chiller is very efficient it seems :)
OG 1048 @ 30C (calculated to 1050 at 20C calibration of Hydrometer) See also how I have managed to get the background perfectly in focus... FFFUUUU!
A quick test of the gravity at 30C gave me 1.048 and using the conversion table I made that to be actually 1.050... 0.004 over the target gravity of 1.046
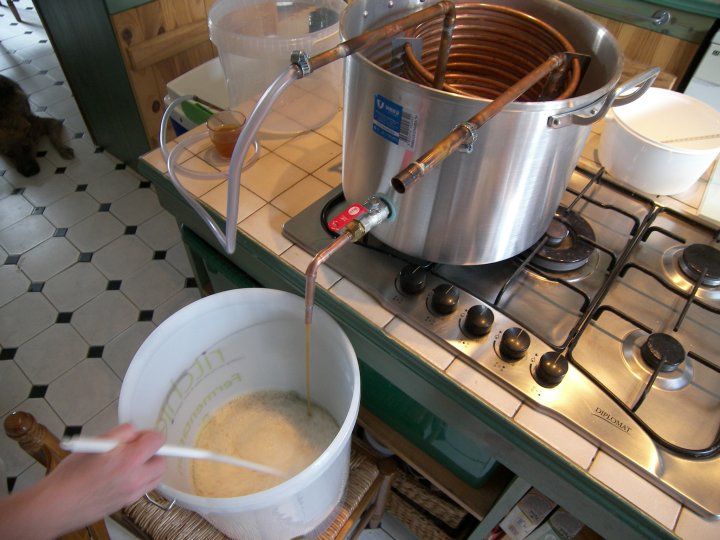
Running the cooled, hopped wort into the fermenter.
16:50 I only managed to get 20l of wort out of the target 23l so boil evaporation losses were higher than the recipe anticipated. I decided to leave it alone rather than top up with freshwater, even though the OG was slightly higher I didn't know how much difference to it adding 3 litres of freshwater would make. I didn't want to end up below the target gravity. Next time I'll add more water to the pre boil total liquor quantity.

17:00 At the time I thought I'd seriously screwed things up at this point. Having taken the gravity reading with the temp at 30C some minutes before while the wort was running into the FV - with me beating it vigorously to aerate it - I pitched the yeast assuming by now the temp would have dropped further below 30C...
Waiting for the froth to subside a little before pitching the yeast.
I'd got 30C in my head but that was the temp in the small hydrometer test tube, NOT the fermenter! With a grimace I found my way through the foam and dipped my thermometer into the fermenter... 32C Aaaarggggghhhhhhhhhh! After all that careful rehydration and nurturing of the yeast during the brewday had I just pitched it into the wort, too hot!??!!!?
Yeast rehydrated and mixed with wort from the mash tun (taken during sparging). By the time I pitched the yeast the froth was above the level where you can see the foil reaching.
All I could now was place the lid on loosely, take the fermenter through to our entertainment room and onto the bar (22-24C most of the time) and wait with fingers crossed that after such a good brew day I hadn't gone and buggered up the yeast.

Four hours later, I knew I'd gotten away with it...

4 hours after pitching the yeast
After 4 hours the yeast head was already better and more lively than the head on my first brew. 

I was delighted with the whole day, my equipment worked well, I felt more relaxed and in control of what was going on and ended up with a bucket of amazing smelling, superbly coloured beer.

Why are we here? For the beer! Roll the bones.

UPDATE 12/09/11 First pint of my all grain Courage Directors enjoyed :)

Saturday, July 30, 2011

First Brew Day - Chilling The Wort & Pitching The Yeast

Continued from part 4, Adding Aroma Hops To the Copper.

I mentioned in the previous post that my home made chiller worked superbly and got the temp down to 32C in around 10 minutes with a lot less wasted water than expected... the plants got a water with tap water today rather than well water.

I stopped at 32C rather than at 20C as I thought that by the time I'd drained the copper into the Fermentation bucket and then aerated it the temp would drop closer to 20C. It didn't, so I sat the FV in the sink surrounded by cold water and ice for 20 minutes or so.

NOTE: The hopped wort had dropped to 66/67C after I'd followed the books advice and added aroma hops at the end of the boil, waited 20 mins, stirred the hops and then waited a further 20 mins - hence the quick drop to 32C when I started up the wort chiller.

I then ran the cooled wort from the copper into the fermenting bin ready for pitching the yeast and beginning turning this sweet, malty brown liquid into real beer!

Running the hopped wort into the fermentation bin. I ran the initial hopped wort into a jug until it cleared slightly as the settled bed of hops began to filter it. Top Left of photo, my Little Wuppit, our GSD, Holly. Bored but watching intently.
As the hopped wort drains from the copper you can clearly see the  hops. I was quite surprised how big they'd got during the boil and soak. When I was adding the dried hops, there didn't seem like there were many going in.

Me. Agitating the hopped wort to get some air into it ready for the yeast. This is where I screwed up a bit and my timing all went to shit thinking this action would cool the wort further towards 20c. Next time, I'll run the chiller for longer as this time I had to wait before I could add the yeast.
Something of a pisser was I only managed to get about 9 litres of hopped wort. Part of the fault was my copper didn't drain fully but this only cost me about a half litre, the biggest culprit is evaporation loss during the boil! I'm told you must not have a lid on however as the evaporation is a part of the process.

I topped the wort up to 12.5 litres with fresh water, this has given me a lower gravity than planned and I'm not really sure what to expect from it.

Final SG was 1040 (great!) but with the wort temp at 26C, hydrometers are calibrated to 20C and so, with some conversion it looks like I actually only got 1023.7, which I think is crap so this might turn out to be a How Not To Do It this time round. We'll just have to see what happens. looks like I was wearing the right T-Shirt for my first brew day, FFFUUUUUUUUU!!!!!

Lessons learned:
  • Small brew sizes are a pain in the arse - even with digi scales some things are too tiny to measure out accurately eg half a sachet of yeast FFFUUUUU, 1.25g of one of the aroma hops... FFUUUUUUU!!!!11!!
  • Temperature monitoring is aukward with a hand held thermometer - definitely adding a dial into my HLT and new copper
  • Juggling temps at the final stages before pitching is quite difficult to a newbie
  • Evaporation losses during the boil are considerable - approx 25% in this case
Some of the loss of final hopped wort was due to my drain in my copper stopping before fully emptied. I tested several times with water and it emptied fully, this time - no doubt due to the crud and hops it stopped with about 3/4 litre of wort left.

Reason for small brew size is mentioned in another post re my stock pot being 10l less than stamped.

The temp has just reached 26C so I've pitched my re-hydrated dried yeast. We'll have to see what happens...

All in all I'm happy with the way the gear I've built works, not happy with the initial mash temp and I've made a note to heat the liquor a few degrees higher next time to allow for the cooling action of the grist as the hot liquor is added. Delighted with my wort chiller, it dropped the temp from 67 (I was following the instructions to stop boil, add aroma hops, wait 20, stir and wait another 20 in which time the hopped wort dropped to 67C) to 32C in about 10 minutes, didn't even fill my mash tun that I was using to collect the waste water.

Now I've got a bunch of washing up and photos to sort through, re-size and edit these last few posts.

Maybe a coffee first... what am I saying!!!? Coffee! ... EFF THAT! Beer ON!!!

Washed up, photos done, blog edited... Hope it was all worth it.

Thursday, July 28, 2011

Home made Beer Wort Chiller - pt.2

AAAARRRGHHHHHHHHHHHHHH!!!!

Never again!!!!

My home made beer wort chiller in place in my brewing boiler/copper
After posting in part 1 of my home made wort chiller build, how easy the bending of the coil had been I then started fabricating a couple of strips with holes drilled in to act as a spacer for the coils to keep each coil about 10mm apart from its neighbours...

The first few coils went well but then... FFFFUUUUUU!!!1!!
Imagine trying to simultaneously thread 15 needles with rigid thread and that's about the sheer, bloody buggeryness of it. So after the best part of three hours (including several swearing breaks) I ended up with this.

Immersion chiller coils threaded into vertical spacer bars. Urgh!
I have no idea if this was needed to be honest but my thinking is there's a larger surface area of chilled copper pipe exposed to the hot wort this way. Unsupported the weight of the coil squashes each coil flat down onto the one below. Lesson learned though for next time (AAARGGHHH) drill larger holes - I could only go up to 10mm as none of my drills will take a larger bit and then had to ream the holes to about 11mm which was hard work enough... Meh!

Anyway, it's finished bar the water connections... probably just hose clip the water pipe for this first brew directly onto the copper pipe stubs.

So here's a few piccies and even though it's an hour before what is typically, "aperitif" time I'm off to crack open a cold Perlenbacher!

After ageing several months fitting the support bars to my copper coil, I began assembling the rest of the wort chiller. My design idea was to have a stable base that is a part of the coolant circuit but avoid any contact with the hop filter in the bottom of the brewing boiler/copper.

Some bits of pipe badly soldered together.
After countless hours of plumbing during the renovation of our house I have become reasonably good at soldering. Maybe not the best looking soldering but 99% leak free, which is nice.

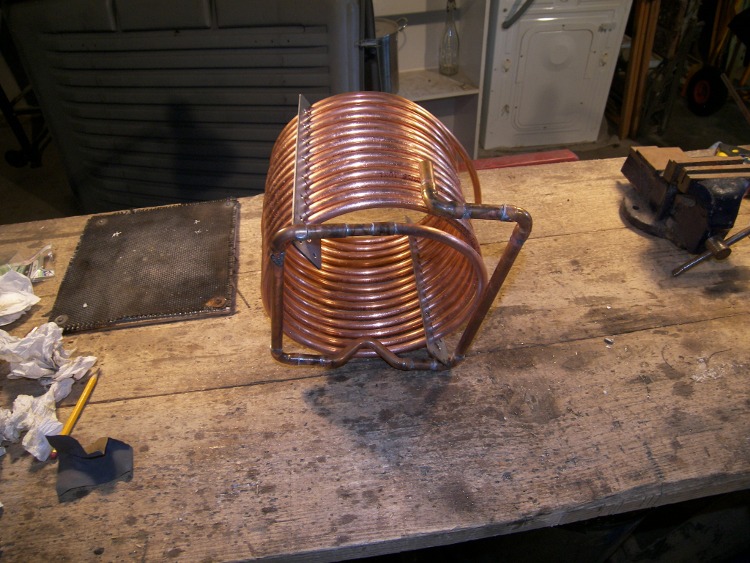
The base unit joined up with the cooling coil, note the bend in the pipe (the bit touching the bench)...
And stood up! pretty stable so far. It's starting to look like a wort chiller.
If you noticed the bend/kink in the base pipework in the last but one photo, it's there to bridge the hop filter that is fitted into the base of my brewing boiler/copper without touching it and possibly blocking some holes. You can see it doing its thing below.

Wort chiller base avoiding contact with the hop filter (centre)
All in all this has been the toughest project to date in the building of my brewing equipment but for me the benefits of full mashed, all grain home brewed beer makes it worth it. Having a plumber mate has certainly helped keep the cost down and I reckon the whole wort chiller has cost less than 30 quid.

My home made, immersion wort chiller in place in my brewing boiler.
If you missed it you can follow this link for Part 1 of building my own wort chiller.

Home made Beer Wort Chiller

Copper pipe coiled and ready to fit to a base unit designed to support the wort chiller in the hot, hopped wort. Note the kink in the centre of the base, rear (left of pic)? That's there to clear the hop strainer in the base of my brewing copper (boiler).
Further to my post yesterday I have a few photos taken during the building of my immersion chiller. Quick re-cap the chiller is used to rapidly cool the boiled wort with bittering hops and later aroma hops to a temperature suitable for pitching (adding) the yeast. If the wort is too hot it will simply kill the yeast.

At one time the hot wort was allowed to cool overnight but this is:

a) very slow
b) a long time to leave the vulnerable liquid exposed to possible contamination

An immersion wort chiller is a simple coil of copper tubing that is placed in the hopped wort in the boiler a few minutes before the end of the boil (this sterilizes the tubing). Once the boil stage is finished, cold water is pumped through the chiller and a simple heat exchange takes place, the cold water is heated as it removes the heat from the hot, hopped wort. This can be quite a wasteful process so I am keen to develop it to use the minimum water and also a way to somehow re-use it - possibly pumped from one storage vessel to another via the copper coil and back again the next time it's used.

The initial hot water outflow from the chiller can be used for washing equipment.

My first, "worry" was how to bend the copper coil with a diameter larger than my boiler to a size small enough to fit in the boiler and also miss the pipework that acts as a hop filter... Hmmmm, I tried bending the end of the tube by hand but it seemed rock solid and considering it's meant to be "soft" it didn't seem so... bugger!

Base support for my home made Immersion Wort Chiller. The fatter pipe in the base is the hop filter leading to the external valve. I wanted to design a chiller base that would happily sit securely on the base of the boiler without interfering with the hop filter.
While I pondered how to bend the copper pipe neatly and without kinking it I began knocking up the base shown above.

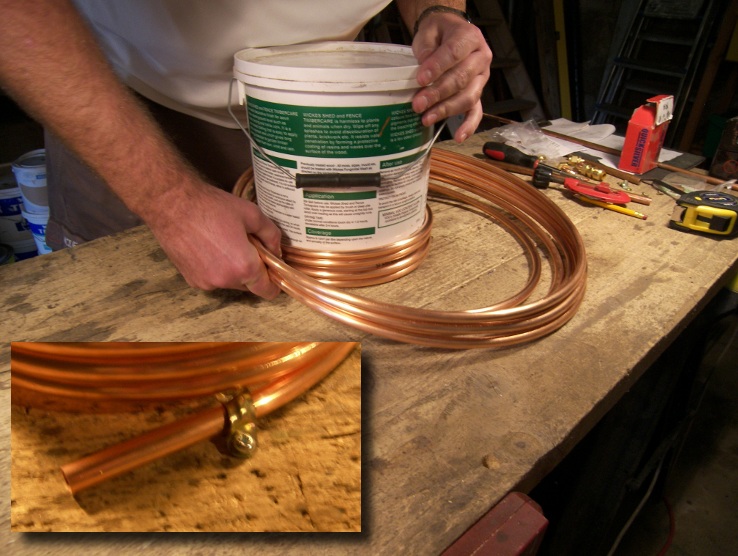
I could delay no longer and had to at least try to bend the coil and so, in a moment of clear thinking, I screwed a 10mm pipe clip over the bottom end of the coil to stop the coil moving. I then placed a very technical tin of fence treatment in the coil and began to turn the coil, easing the part in contact with the tin around a bit at a time as shown below. (inset pic shows the support fix to the bench)

Bending the copper pipe. The first coil was hardest to do as the tin kept trying to move, after that the first, new coil actually holds the tin in place and helps a great deal.
All in all it took about 5 or 6 minutes to bend the coil. At first it was quite aukward as pulling the pipe around the tin was making the tin move. After the first coil had wrapped around the tin though it held it in place and the rest followed quite easily. I was very surprised at how easy it was, I was expecting it to be a total pig and this is something I've been putting off doing for that reason.

<rawhide>Coiling, coiling, coiling. Keep that copper coiling!</rawhide>
After a few minutes this is what I ended up with. Niiiiice.


The bottom pipe will solder onto the base I made and the top will connect to either the outflow to waste or inflow from the cooling source. I am undecided as yet which way to run the chiller. Some brewers say cold in at the bottom, hot out at the top. Others say the opposite. At the end of the day it can run either way so I think I'll just do both and see which gives best results.

Almost finished. The upright facing elbow at the rear, right of the base will have along pipe attached for the water supply to connect to.
Looking at how the copper pipe collapses back down onto itself in a tight coil I think I might get some stainless steel strips, or aluminium and drill 11mm holes spaced evenly. thread the tub through the vertical, drilled strips and they'll space the copper tubing allowing a greater surface area of contact with the hot, hopped wort.

I am just about to go and finish the chiller off so there should be an update later today.

Follow the link for PART 2 of building my own wort chiller.

Monday, July 25, 2011

Beer Wort Chiller - Copper Coil Ordered

Immersion Type Beer Wort Chiller used in Full Grain Brewing

After a lot of looking for a 5 metre coil of 10mm copper pipe and getting disillusioned with a) the price and (b) the rarity of 10mm coils my mate and neighbour, Christophe has got back to me with a quote for the beast at just under 18 euros!!! That's a fair bit more than half of the price I've seen elsewhere.

It turns out his Dad is a plumber who does a lot of brewery fitting! Niiiiice :)

So, the last of my equipment items should be ready within a few hours of it arriving. The design itself is very simple. Cold water passes through the copper coil which is immersed in the hot wort (the unfermented beer, the result of mashing and sparging the malted grains) and lowers the temperature from just below boiling to around 20C so that the yeast can be added.

Add the yeast to the wort when it's hot and it'll kill it.

The wort can be allowed to cool naturally but it can take up to 24 hours which is along time for the (at this stage) very delicate beer to possibly end up in contact with nasties that can easily ruin the whole batch of beer.

So, cool the wort quick, get the yeast in and get it covered!

However, as is my way, I've been toying with another way of doing it...

In order to bring the temperature of the wort from 100C to around 30C requires, on average, the cold water passing through the immersion chiller for upwards of 20-30 minutes. This is along time to have a cold tap running. the initial water exiting the chiller is hot, the transferred heat from the wort the chiller is immersed in, and can be used for washing equipment etc but only a few gallons.

It seems to me in this day of sustaining resources and increasing utility bills, an awful waste of water. I suppose water butts for the garden could be filled but we have a well*so our gardening water is free, no need to run a tap.

I thought instead, what if I pass the hot wort through the coil (rather than the cold water) and instead of immersing the coil in my copper/boiler I immerse it in a large bucket of cold water. Large enough to hold a decent volume of water so it doesn't warm up quickly and also large enough to have a series of frozen 2litre bottles of water placed in to keep re-chilling the surrounding water.... It might just work dammit!

When used the traditional way, the immersion chiller is placed into the boiling wort ten minutes or so before the end of boil to sterilize it. in my case this would be lacking so I would have to sterilize the coil in a large pan of boiling water first. In my case, only the inside of the pipe would be in contact with the hot wort so to be safe, first I'll sit it in a bath of liquid sterilizer, give it a good rinse then boil it.

Just got to wait for the dagnamming thing to arrive now.

*Although we have a well, I have not had the water tested. It smells a bit rough when first pumped out so I don't fancy risking using it anywhere near my beer... Just in case you were thinking I could pump well water (very cold) through my chiller.