Wednesday, December 12, 2012

Brewery Build - Hot Liquor Tank Sight Glass

Finally, apart from outer insulation, my hot liquor tank is finished! The John Guest push fittings and a length of polycarbonate tube from Rob, The Malt Miller arrived with my last delivery of grain and hops.

It was -7 outside and drilling stainless in those temps is rather distracting, I managed to cut myself a few times on various things without even realizing.

Biggest frak up, almost, was the positioning of the sight glass. Only by absolute fluke does the polycarbonate tube not interfere with the handle on the drain valve. Fully closed, the valve lever just touches the tube...

Pics.

Sight glass fitted, ready to wrap the tank up in some insulation.

Oops, a bit close for comfort. Luckily the valve still closes fully.

Thursday, November 29, 2012

Brewery Build - Hot Liquor Tank & Oak Mash Paddle

EDIT: Wow, I got my SIRET number today! This means my brewery is now officially registered as a business, it's called Arti-Brassage87 - arti for artisanal, brassage for brewing and 87 is the department of the Haute Vienne where I live, in the Limousin. So, in English, CraftBrewing87. I've sent a copy of my registration to the Douanes who have been waiting patiently for the Chamber of Trade to get their act together and issue my SIRET. Now they can complete my dossier and grant me an Excise Number in order that i can pay duty and begin to sell my beer! It's been months and months of long, hard slog to get here but it's finally dropping into place.

Long few days, here's photos... maybe some words along the way. Bottled another batch of Bramling Best Bitter and started work on my website for my Brasserie Artisanal en Limousin (Craft Brewery in Limousin)

So, the other day I found the remains of an old, oak shelf I'd ripped down on the saw bench a couple of years ago. I can't remember what I did with the other bit but the bit I found was just over 800mm long and about 70mm wide. So, I drew a paddle shape on it and got the jigsaw out. Bit of drilling, a lot of sanding and... voila - 2 hours, job done.


Four beers on the go at the minute, samples for gravity checks. Anti-clockwise from top-left: Bramling Special Bitter (experiment using WLP002 instead of usual SO4), Cascade Pale Ale, Bramling Bitter and a new one, Lathière Stout (pronounced La-tee-err after the hamlet I live in).

After that I got on with some plumbing in the brew house.


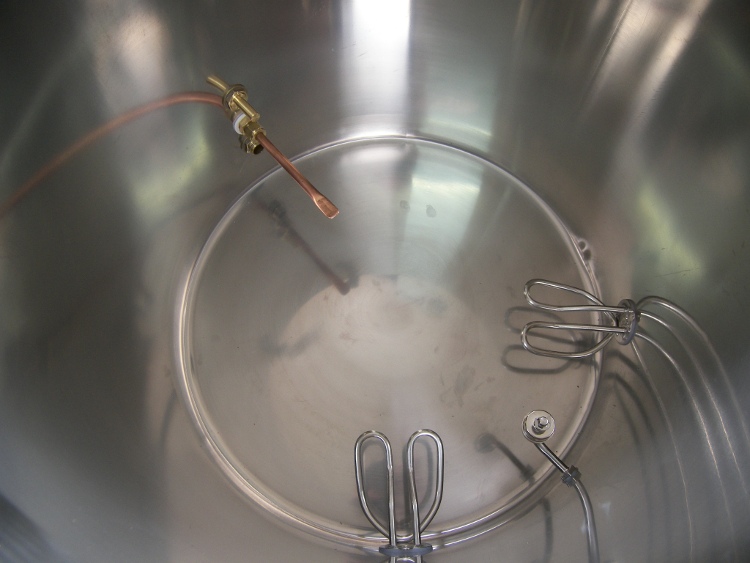
Above is the cold feed for the immersion chiller with quick release hose connector. I'm sticking with an immersion chiller for now. I've heard and read too many people complaining about plate chillers to go there just yet. i also still don't like the idea of going to all the trouble to get a clear beer and then dump all the cold break into the FV. I know many do it, I know many say it's beneficial but, I'm not yet convinced it's for me. The pain of blockages and worry of sanitising correctly not to mention needing a reliable 100c+ rated pump that doesn't cost the same as a small car....

Below, the T piece feeds cold water down and along to the immersion chiller circuit while the above section (with valve) is for filling the hot liquor tank. Water will come into the brewery and pass through a sediment and carbon filter first. I was originally going to split the feed and bypass the filter for the immersion chiller BUT having now gone solder free and used compression fittings everywhere, the output from the IC will be ok. So the bonus is, I can fill my HLT from the IC output and not waste gallons of precious water down the drain.


Pipe feed to the above T section, bent round and under the shelf to pass behind the fridge and along the wall at the right hand side to the cold main feed.


Bored with plumbing, back to stainless drilling. 20mm TCT BANG! High speed with a bit of oil and it's through in around 12 seconds. Much better than my previous 2 hours!


Above, float switch fitted in between the two 1.5kw elements. This will shut off the temperature controller that runs the heaters in the event I forget to turn them off manually (I will, I know I will) when the HLT is being run off.


Close up of the float switch. I had the switching circuit check (by my Dad, cheers Dad!) to find out the switch is ON when at the top and OFF when down as seen above. Some reason I'd presumed it was the other way and was going to mount the switch pointing downwards. So, with water in the float rises and the circuit for the heaters is made, as the water level drop the circuit is broken and the heaters turn off with about 30-40mm water level above them.


Top left, brass thermowell for thermometer, home made copper thermowell for STC1000 temp controller probe (the gadget that runs the heaters) and just visible below that, the outlet valve, the take up pipe is not currently fitted.


Up at the top, on the left the cold fill inlet and over at the other side the inlet from the three way manifold run off a Kaixin Pump to re-circulate the hot liquor tank to ensure even temp distribution. The three way manifold will also send HLT contents to the Mash Tun and also a hand held spray nozzle for cleaning in place.


Closeup of thermometer and STC1000 thermowells and the outlet.


As seen from the outside, minus external insulation.


And finally, for now. plumbed in. Cold feed at the right, outlet via valve to Kaixin Pump and into the manifold at the left. manifold back to HLT for re-circ. I even used blue cable ties for cold bits and red ones for hot bits.

I'm bloody knackered but loving it :)

Order due to arrive tomorrow or Saturday from Rob,  The Malt Miller and I'll be brewing - still on the little rig for now - for the next few days.

Saturday, November 24, 2012

A5 Flyer Designs & Labels

Brewery is now registered, just waiting on my new SIRET number to give to the Douanes (Customs) so they can complete my dossier and issue me an Excise number so I can begin selling.

Designs are very much a work in progress. Three for now, there are 6 or 7 others but you get the picture...


Tuesday, November 20, 2012

Brewery build, Starrett 20mm TCT Stainless Hole Saw & Stainless Steel Float Switch for Hot Liquor Tank.

I've been brewing the last four days so no real build progress but here are some toys that arrived, a stainless steel float switch and a Starrett 20mm TCT Stainless Hole Saw.

Stainless steel float switch. This will be fitted in the hot liquor tank as a saefty cut off for the two kettle elements. I will forget to turn them off manually one day without doubt. This will ensure that when the liquor level is running low, the switch will switch a relay and cut the two elements off.

Starrett 20mm TCT Stainless Hole Saw - Very nice bit of kit indeed, like a hot knife through butter.

Saturday, November 17, 2012

Brewery build.... more...

In the middle of finishing off today's brew day (Cascade pale ale) so not much text. Bits and bobs done the last few days.

Steel stand for my boiler, not sure the built in stand on the 15kw burner will hold 100l of wort. Also had a play around with timber cladding for the boiler and HLT and I've finally summoned the courage to attack my HLT with a 40mm Q-Max cutter and punched the holes for the two, 1.5kw elements.

Pics.


And a pint of Wild Boar, Yummy.

Wednesday, November 14, 2012

Brewery Build continues

Not much to show, mostly cosmetic. Doors made and fitted to the brew area. I was going to just block most of it off but there's some reasonably good storage space underneath for bits and bobs.


Colours of Autumn.

Wednesday, November 7, 2012

Brewery Build - Quick update

Another quickie, bloody knackered.

More cladding finished and now stained, pots sat in place ready to begin working out the cable, pipe runs etc and start looking at putting it all together. 40mm Q-Max cutter enroute for the two 1.5kw elements in the HLT - Starrett (germany, still not heard back from France) wanted silly money (£30) for postage of the 45 euro, 40mm TCT hole cutter so I told them to go away and bollocks!

Getting there, slowly.

Sunday, November 4, 2012

Brewery Build, some more progress.

Here's a few more piccies of progress so far, not a lot of text, I'm too tired to type lol

Re-shuffle, HLT now at the right and higher up. System will be pumped but can revert to gravity if needed ie during power-cuts or if a pump fails.

15kw burner for the 100l boiler.

One of my Kaixin pumps and some plumbing bits and bobs. 3£ way manifold is for the HLT, 1 for recirc, one to Mash Tun and the other for a hand held spray head for rinsing stuff down.

Last bit of wall cladding almost finished.

Fridge in, it's controlled by an STC1000 so can be set to various temps either for beer or yeast storage.

Discovered a leak from around the door frame, couldn't find the source at first. It was right at the top of the roof and channelling down one of the roof joists. Fixed the offending tiles and the leak stopped. It did allow me to see my sloped floor working as it should though.

Brew kettle at left, HLT at the right. HLT still waiting for sightglass, temp probe, heating elements and recirc plumbing holes to be drilled. Stainless steel is a total bastard to drill even with 3 special SS drill bits. Waiting on a 40mm TCT hole saw from Starret for the element holes.

Hop filter fitted  (upside down to show the holes) and just visible, the thermowell for the dial thermometer.
I'm a bit further on with the cosmetics of the brew house, fair bit of painting and what not today.

Friday, October 26, 2012

Brewery Build - Progress

Unfortunately my wife, Sarah had a resurgence of a trapped nerve problem she had last year and had to spend a few days in hospital so I'm a bit behind schedule on the brewery.

The floor is done and I've now sorted out a stable type door for it. It's amazing what you can make with a couple of packs of bargain floorboards.

Top bit of door and the finished floor with fully functional floordrain.

Pretty much finished, there's now a drip strip that covers the gap along the bottom of the top door.

A well deserved pint of what I'm calling Vieux Sanglier (Old Boar).


Tuesday, October 9, 2012

Brewery Build, sloped floor first bay...

Started on the concreting today. Smallest bay first as I've never done a sloped floor before.... actually, I've never done a floor before. Wasn't too painful all in all.

And it slopes to the drain. A drop of about 1/4", enough to let the water run to the drain but not enough to feel like the place is falling over.

80l Marmite Thermos and 100l Shiny Brew Pots Arrived

One word, YAY!

2 x 100l stock pots and an 80l thermo pot for mash tun.
One photo, shiny!

And now another photo with them sat in their place.

Left to right - Copper, Hot Liquor Tank and Mash Tun


Sunday, October 7, 2012

Brewery build - Putting in the floor drain.

This wasn't quite as complex a job as I'd been expecting but it was a bit fiddly. The plumbing runs were a bit aukward and I managed to slice the end of my finger open trying to move a piece of ceramic tile I was using as packing to support the pipework before concreting it all in.

Anyway, pics...

The floor as it was, bottom right of pic is the fortuitously situated manhole cover for an external drain. Should be easy to knnck through and bring the new floor drain waste pipe through...

All marked up and the disk cutting begins, the fan is to blow the foul dust out as quickly as possible. I still looked  like  a dusty old corpse afterwards.

No too deep before hitting soil so nor to start digging. Living in a part of rural France that was  quite a large area of Resistance fighters in the war there's a tendency to come across caches of weapons and explosives from time to time. The Gendarmes promptly arrive to dispose of said items but I'm always a little worried about digging.

Loosely fitted with the plumbing for the u-trap to make sure I've dug deep enough.

Now to start gluing it all together. I made the u-trap using a series of 90 degree bends as  the actual formed/moulded u-traps were 30 bloody euros! Made this one for about a fiver. Picked up the actual metre long drain for only 15 euros too.

Ready to fit. The pipe running off to the left is the pipe to the drain outside. To the right will be for the sink waste.

I actually managed to get all the angles right.

In place and ready to start filling it all back in again. Knocking through the wall of the outside drain was an absolute bastard. No idea what material it was cast from but it made my hammer drill earn it's keep. Chisel bits and drills, you name it. Almost 2 hours to get a 50mm hole through.

The drain currently sits about an inch above the present floor surface as I'm concreting a new top layer that'll be gently sloped to the drain from all directions.. Even using loads of rubble as back fill I've still managed to get through a bag and a half (45kg ish) of ready mix at this point so I'll need to get some more before I can finish the floor surface. It'll be good to get the old cement mixer out again :)

Reward, a pint of my Apollo IPA.