For brewing using the full, malted grain and hops method we need hot water and quite a lot of it. Not only that but after the wort (the raw unfermented beer if you like) has been mashed and sparged (see my post about building my first mash tun) it is then brought back up to the boil (the boiler becoming the copper) before the bittering hops and later, the aroma hops and any other adjuncts are added.
For my first foray into the world of full grain homebrewing I shall be heating my boiler simply using a gas burner. Although I see how much more practical it is to have a heating element within the boiler itself I can see that bringing a large volume of water to temperature and sustaining it at a rolling boil for an hour or more would be quite costly on the old leccy bill... I haven't dismissed it and my plan is to ultimately work a heater into this setup, but for now...
34l (7.5 gallons-ish) stock pot with a nice fitting lid
Tank connector
Valve - to act as my tap
14mm (note: I may increase the size of this*) copper pipe
5x 14mm 90deg elbows
1x 14mm T
2x silicon fairy cake moulds LOL - I cut the bases out to make two heat resistant washers to seal the valve fitting.
Tools:
Pipe cutter - you can use a hack saw but you might have to file the rough edges.
Hand drill
Pedestal drill
Spanner (for tightening the valve against the wall of the boiler)
3mm drill bit
10mm drill bit
Steel reamer (I haven't got a drill bit large enough to drill the stock pot wall to 20mm for the valve/tank connector)
Steel countersink bit
PTFE tape, for the valve to seal onto the tank connector pipe - it leaked like a bugger during my mash tun building.
Hand vice, not sure what it's really called but you clamp the pipe in it when drilling the drain holes.
Center punch
Flat file
Round file
Wire wool
*I decided that I'd like the internal plumbing to be interchangable - the 14mm piping set up can be removed and swapped for a larger bore 18mm single pipe with larger diameter holes drilled. Why? To my thinking the initial boil is just fresh water and from the boiler to the mash tun we need to get the hot water in there quickly hence the 18mm large hole piping. However, after mashing comes the sparging which requires a slower flow (yes I suppose it can be controlled by the valves but the ones I have are a little bit ON or OFF with even the halfway cracked point being virtually off.) and then after boiling the wort and adding hops the brew need transferring to the fermenting vessel and one thing I remember about brewing from kits in the past is that if the brew flows fast you quickly end up with a frothy mess that you have to wait ages for to settle. I want it to be fairly quick process all in all.
 |
| 10mm hole drilled in my brewing boiler |
Not having a drill bit larger than 14mm and needing a hole size of at least 20mm, I had to first drill a 3mm pilot hole, then up it to 10mm so I could get my reamer in and then carefully ream out the hole until the tank connector (threaded brass pipe) could turn in.
I purposely wanted it tight to aid with the seal as much as possible.
The reaming was quite a steady job, it's easy to go too fast and end up with an oval hole... this is a bad thing.
 |
| Reaming the hole up to 20mm for the tank connector |
With perfect timing I stumbled upon a thread on the superb Jim's Beer Kit forum about using cut up silicon baking sheets to use as heat resistant washers! Genius!!!
Rather than risk the wrath of the current wife by chopping up one of her sheets, I nicked 2 silicon fairy cake cases and legged it to the workshop.
 |
| With a little scissor action you too can ruin 2 perfectly good fairy cake cases. |
 |
| The valve fitted and sealed with a fairy cake case washer. |
 |
| Inside sealed up lavverly jabberly! |
 |
| 14mm Copper Pipe Filter for Homebrewing Brew Boiler (undrilled) |
 |
| The filter (undrilled) fitted into the base of the brewing boiler |
Also, come the time it has boiled wort (I will gradually learn the real terms for these things) and hops in there I want as many exit holes as possible to avoid blockages when draining it to the fermentation vessel.
Now comes the really tedious bit, drilling the drain holes. Lot's of them. I marked the visible parts of each pipe ie the bits that aren't pushed into the elbow and T fittings 10mm apart and then turn the pipe 1/4 turn and marked again at 10mm points but staggered between the first marks as shown rather badly below...
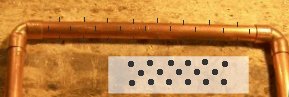 |
| The rather grotty drawing shows markings for the staggered holes, if the pipe were rolled out flat. |
 |
| Center punch the marked pipes ready for drilling. |
HANDY HINT ALERT!!!

Use a steel countersink to de-burr the copper pipe. It not only takes the sharp edges off, it gives a nice looking bevel to the edge of the hole too. {applause} Thank you very much, I'm here all week!
After several months of drilling, de-burring, filing the inside burrs off with a round file and finally finishing with steel wool you'll have something a little like these.
 |
| Holey, shiny copper pipes Batman! |

As I mentioned towards the start of this post I am also making a larger bore (no not me) version using 18mm pipe.
Still to do with this device:
Fit a thermometer - I want one of those groovy looking, steampunk dial types that stick out of the front like weird looking eye clock thing.
Fit a heater... maybe. We'll see what gas bill/electric bill comparisons are like.
Fit a graded sight glass thing for use during the liquor (water) boiling so I can see the liquid level without having to take the lid off and accurately dispense the hot liquor when mashing and sparging.
No comments:
Post a Comment