 |
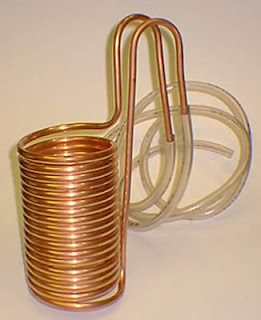
| Immersion Type Beer Wort Chiller used in Full Grain Brewing |
After a lot of looking for a 5 metre coil of 10mm copper pipe and getting disillusioned with a) the price and (b) the rarity of 10mm coils my mate and neighbour, Christophe has got back to me with a quote for the beast at just under 18 euros!!! That's a fair bit more than half of the price I've seen elsewhere.
It turns out his Dad is a plumber who does a lot of brewery fitting! Niiiiice :)
So, the last of my equipment items should be ready within a few hours of it arriving. The design itself is very simple. Cold water passes through the copper coil which is immersed in the hot wort (the unfermented beer, the result of mashing and sparging the malted grains) and lowers the temperature from just below boiling to around 20C so that the yeast can be added.
Add the yeast to the wort when it's hot and it'll kill it.
The wort can be allowed to cool naturally but it can take up to 24 hours which is along time for the (at this stage) very delicate beer to possibly end up in contact with nasties that can easily ruin the whole batch of beer.
So, cool the wort quick, get the yeast in and get it covered!
However, as is my way, I've been toying with another way of doing it...
In order to bring the temperature of the wort from 100C to around 30C requires, on average, the cold water passing through the immersion chiller for upwards of 20-30 minutes. This is along time to have a cold tap running. the initial water exiting the chiller is hot, the transferred heat from the wort the chiller is immersed in, and can be used for washing equipment etc but only a few gallons.
It seems to me in this day of sustaining resources and increasing utility bills, an awful waste of water. I suppose water butts for the garden could be filled but we have a well*so our gardening water is free, no need to run a tap.
I thought instead, what if I pass the hot wort through the coil (rather than the cold water) and instead of immersing the coil in my copper/boiler I immerse it in a large bucket of cold water. Large enough to hold a decent volume of water so it doesn't warm up quickly and also large enough to have a series of frozen 2litre bottles of water placed in to keep re-chilling the surrounding water.... It might just work dammit!
When used the traditional way, the immersion chiller is placed into the boiling wort ten minutes or so before the end of boil to sterilize it. in my case this would be lacking so I would have to sterilize the coil in a large pan of boiling water first. In my case, only the inside of the pipe would be in contact with the hot wort so to be safe, first I'll sit it in a bath of liquid sterilizer, give it a good rinse then boil it.
Just got to wait for the dagnamming thing to arrive now.
*Although we have a well, I have not had the water tested. It smells a bit rough when first pumped out so I don't fancy risking using it anywhere near my beer... Just in case you were thinking I could pump well water (very cold) through my chiller.
5 comments:
Just an idea steve. What about getting an old car radiator from a scrappies, or a cheap new one if you can find one. Rig up small pump/circulator available from most DIY/plumbing suplliers and have a sealed cooling system.
That way the water heated by the wort can be cooled by the radiator and re-circulated so you don't need to waste gallons of running water. This will also save the hassel of having to clean and disinfect the coil after every brew.
Cheers
Alex
I'd need a fan to cool the radiator or at least make my brewing rig, drivable! i could drive while I brew!!!
Yo Dawg, I heard you liked brewing so we put a brewery in your car so you can brew while you drive!
Lol! Drink driving may be illegal but there's nowt against brew driving. You could add it in to your micro-brewery business - fresh brewed beer, freshly delivered!
The reason I suggested a car radiator is because they are very efficient heat exchangers and you can get them with fans fitted that will run off a 12V battery. I looked some up and you can get generic ones brand new and clean for about £40 add in a 12V circulator and a solar panel to keep the battery charged and wallah your very own eco wort cooling system! :-)
I also reckon the closed-loop system is a winner - except doing it in such a way that you dont ahve liquid sitting round in your chiller all the time:
bucket - pump - IC - bucket. Means you can start with really cold water, even adding ice (or if a lager doing salt-saturated ice water, which can then be returned to the freezer for the next time)
Good idea guys, I'll certainly look into it more. I have had a bit of a rethink about my above post after getting some feedback from a couple of home brew forums.
I found out that by running the beer through the chiller the 'cold break' takes place in the fermenting vessel which I think basically means you end up with a lot more settled out debris than you would by chilling in the copper/boiler... I may try it run both ways, with a couple of low volume, test brews and see what happens.
Post a Comment