Not a long post but just a quicky to say that my first, all grain brew from Saturday is fermenting like a goodun! It's through in the room we call Baton Rouge - the converted downstairs of a small cottage built onto the side of the main house. Holding temp at 20C-22C at all times of the day and night. Good, scummy froth on the surface and it smellllls gooooooooood! :O)
If you missed my brew day as it happened blog it starts here: Part One - First All Grain Brewday, Mashing the grist.
Sunday, July 31, 2011
Saturday, July 30, 2011
First Brew Day - Chilling The Wort & Pitching The Yeast
Continued from part 4, Adding Aroma Hops To the Copper.
I mentioned in the previous post that my home made chiller worked superbly and got the temp down to 32C in around 10 minutes with a lot less wasted water than expected... the plants got a water with tap water today rather than well water.
I stopped at 32C rather than at 20C as I thought that by the time I'd drained the copper into the Fermentation bucket and then aerated it the temp would drop closer to 20C. It didn't, so I sat the FV in the sink surrounded by cold water and ice for 20 minutes or so.
NOTE: The hopped wort had dropped to 66/67C after I'd followed the books advice and added aroma hops at the end of the boil, waited 20 mins, stirred the hops and then waited a further 20 mins - hence the quick drop to 32C when I started up the wort chiller.
I then ran the cooled wort from the copper into the fermenting bin ready for pitching the yeast and beginning turning this sweet, malty brown liquid into real beer!
Something of a pisser was I only managed to get about 9 litres of hopped wort. Part of the fault was my copper didn't drain fully but this only cost me about a half litre, the biggest culprit is evaporation loss during the boil! I'm told you must not have a lid on however as the evaporation is a part of the process.
I topped the wort up to 12.5 litres with fresh water, this has given me a lower gravity than planned and I'm not really sure what to expect from it.
Final SG was 1040 (great!) but with the wort temp at 26C, hydrometers are calibrated to 20C and so, with some conversion it looks like I actually only got 1023.7, which I think is crap so this might turn out to be a How Not To Do It this time round. We'll just have to see what happens. looks like I was wearing the right T-Shirt for my first brew day, FFFUUUUUUUUU!!!!!
Lessons learned:
Reason for small brew size is mentioned in another post re my stock pot being 10l less than stamped.
The temp has just reached 26C so I've pitched my re-hydrated dried yeast. We'll have to see what happens...
All in all I'm happy with the way the gear I've built works, not happy with the initial mash temp and I've made a note to heat the liquor a few degrees higher next time to allow for the cooling action of the grist as the hot liquor is added. Delighted with my wort chiller, it dropped the temp from 67 (I was following the instructions to stop boil, add aroma hops, wait 20, stir and wait another 20 in which time the hopped wort dropped to 67C) to 32C in about 10 minutes, didn't even fill my mash tun that I was using to collect the waste water.
Now I've got a bunch of washing up and photos to sort through, re-size and edit these last few posts.
Maybe a coffee first... what am I saying!!!? Coffee! ... EFF THAT! Beer ON!!!
Washed up, photos done, blog edited... Hope it was all worth it.
I mentioned in the previous post that my home made chiller worked superbly and got the temp down to 32C in around 10 minutes with a lot less wasted water than expected... the plants got a water with tap water today rather than well water.
I stopped at 32C rather than at 20C as I thought that by the time I'd drained the copper into the Fermentation bucket and then aerated it the temp would drop closer to 20C. It didn't, so I sat the FV in the sink surrounded by cold water and ice for 20 minutes or so.
NOTE: The hopped wort had dropped to 66/67C after I'd followed the books advice and added aroma hops at the end of the boil, waited 20 mins, stirred the hops and then waited a further 20 mins - hence the quick drop to 32C when I started up the wort chiller.
I then ran the cooled wort from the copper into the fermenting bin ready for pitching the yeast and beginning turning this sweet, malty brown liquid into real beer!
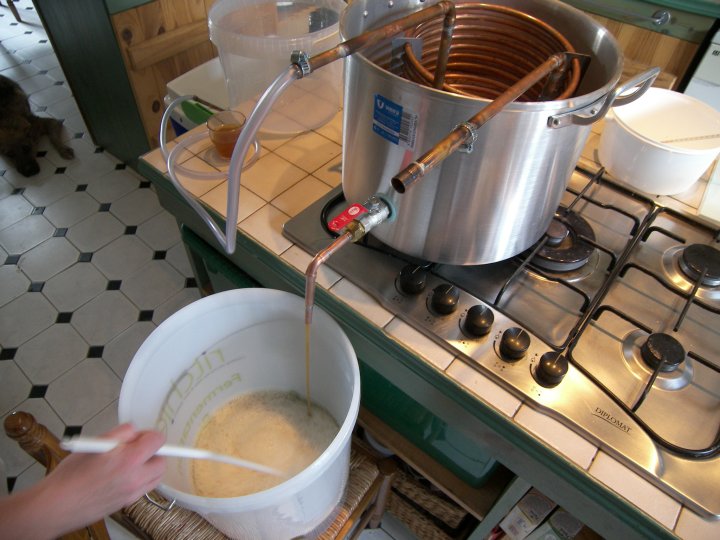 |
| Running the hopped wort into the fermentation bin. I ran the initial hopped wort into a jug until it cleared slightly as the settled bed of hops began to filter it. Top Left of photo, my Little Wuppit, our GSD, Holly. Bored but watching intently. |
 |
| As the hopped wort drains from the copper you can clearly see the hops. I was quite surprised how big they'd got during the boil and soak. When I was adding the dried hops, there didn't seem like there were many going in. |
 |
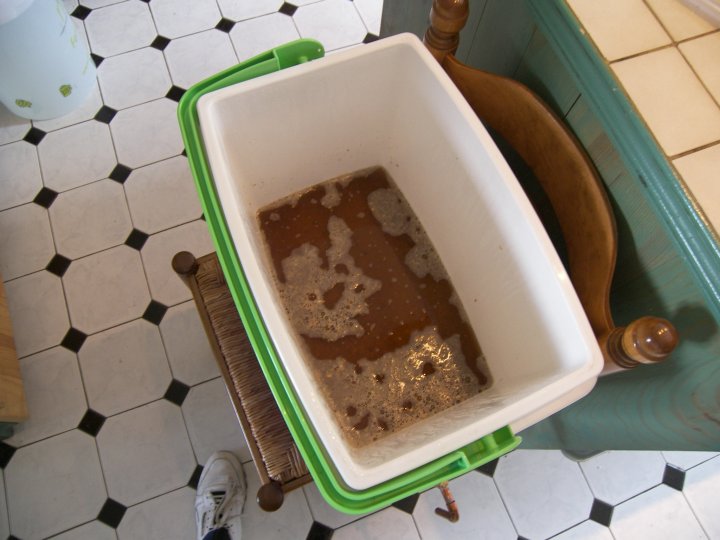
| Me. Agitating the hopped wort to get some air into it ready for the yeast. This is where I screwed up a bit and my timing all went to shit thinking this action would cool the wort further towards 20c. Next time, I'll run the chiller for longer as this time I had to wait before I could add the yeast. |
I topped the wort up to 12.5 litres with fresh water, this has given me a lower gravity than planned and I'm not really sure what to expect from it.
Final SG was 1040 (great!) but with the wort temp at 26C, hydrometers are calibrated to 20C and so, with some conversion it looks like I actually only got 1023.7, which I think is crap so this might turn out to be a How Not To Do It this time round. We'll just have to see what happens. looks like I was wearing the right T-Shirt for my first brew day, FFFUUUUUUUUU!!!!!
Lessons learned:
- Small brew sizes are a pain in the arse - even with digi scales some things are too tiny to measure out accurately eg half a sachet of yeast FFFUUUUU, 1.25g of one of the aroma hops... FFUUUUUUU!!!!11!!
- Temperature monitoring is aukward with a hand held thermometer - definitely adding a dial into my HLT and new copper
- Juggling temps at the final stages before pitching is quite difficult to a newbie
- Evaporation losses during the boil are considerable - approx 25% in this case
Reason for small brew size is mentioned in another post re my stock pot being 10l less than stamped.
The temp has just reached 26C so I've pitched my re-hydrated dried yeast. We'll have to see what happens...
All in all I'm happy with the way the gear I've built works, not happy with the initial mash temp and I've made a note to heat the liquor a few degrees higher next time to allow for the cooling action of the grist as the hot liquor is added. Delighted with my wort chiller, it dropped the temp from 67 (I was following the instructions to stop boil, add aroma hops, wait 20, stir and wait another 20 in which time the hopped wort dropped to 67C) to 32C in about 10 minutes, didn't even fill my mash tun that I was using to collect the waste water.
Now I've got a bunch of washing up and photos to sort through, re-size and edit these last few posts.
Maybe a coffee first... what am I saying!!!? Coffee! ... EFF THAT! Beer ON!!!
Washed up, photos done, blog edited... Hope it was all worth it.
First Brew Day - Aroma Hops In - Pt 4
Continuing on from Part 3, Boiling The Wort & Bittering Hops. (Excuse the tenses, some of this was posted at the time it was happening, the rest, like this bit, has been edited in later.)
The aroma hops have been added, just giving them 20 minutes soak before stirring and waiting another 20 minutes (according to the instructions in the book for this recipe see part one, mashing the grist .)
20 minutes from adding the aroma hops, there appears to be what looks like a very slight oily looking film. I'm thinking it might be the essential oils coming from the hops. It appears to be coming from the floating hop debris... just waiting on some response in my Brew Day thread on Jim's Beer Kit forum as to if this is normal or not... [edit - some feedback suggested it was as I thought, essential oils from the hops.]
Coming up to 30 minutes from adding aroma hops and the wort is clearing noticeably. I could only see 1 ring of the chiller coil a few minutes ago, now there are 3!
A few mins left before immersion cooling starts. The wort temperature has already dropped to 66C so it looks like I won't be needing to run the chiller for as long, which is nice.
Immersion, wort chiller fired up after the aroma hops had had 40 minutes. Worked a treat!!!! The initial outflow was warm but not hot and a bit of tweaking of the cold water flow rate soon got a good through flow of cooling water through the copper coils of the wort chiller.
Rather than waste the out flowing water from the wort chiller, I ran it to my now empty mash tun but there was little need to worry about waste water. The hot wort was cooled to 32C before the tun was even filled. (poured it into the water butt outside for the garden).
Ooops, I've got a bit ahead of myself now so there's a bit more about the wort chilling in the next post, chilling the wort and pitching the yeast.
 |
| The Aroma Hops ready to be added to the boiled wort and bittering hops. |
20 minutes from adding the aroma hops, there appears to be what looks like a very slight oily looking film. I'm thinking it might be the essential oils coming from the hops. It appears to be coming from the floating hop debris... just waiting on some response in my Brew Day thread on Jim's Beer Kit forum as to if this is normal or not... [edit - some feedback suggested it was as I thought, essential oils from the hops.]
Coming up to 30 minutes from adding aroma hops and the wort is clearing noticeably. I could only see 1 ring of the chiller coil a few minutes ago, now there are 3!
A few mins left before immersion cooling starts. The wort temperature has already dropped to 66C so it looks like I won't be needing to run the chiller for as long, which is nice.
Immersion, wort chiller fired up after the aroma hops had had 40 minutes. Worked a treat!!!! The initial outflow was warm but not hot and a bit of tweaking of the cold water flow rate soon got a good through flow of cooling water through the copper coils of the wort chiller.
 |
| The wort chiller in action. waste water is running off into my empty mash tun. |
Ooops, I've got a bit ahead of myself now so there's a bit more about the wort chilling in the next post, chilling the wort and pitching the yeast.
First Brew Day. Boiling the Wort and Bittering Hops. Pt. 3
Continuing on from part two, sparging the mashed grist. I'll fill this in properly later (edit, please excuse the tenses changing as you read, some was written as it happened the rest, like this bit, has been edited in later). Good boil, lovely smells filling to kitchen.
Not a lot to write about the boil really, it took about half an hour to get the wort to a rolling boil before adding the bittering hops.
Getting towards the end of the 60 minute boil time the boiling wort is beginning to clear, the hops continue to tumble around but something is definitely happening here...
My home made Immersion Wort Chiller was sterilized*, rinsed well and then placed in the boiler 10 mins before end of boil. Five minutes before the end of the boil I added the copper finings, in this recipe I used so called Irish Moss which is actually a dried seaweed called Caragheen.
*I know there's no need to pre sterilize the chiller as the ten minutes in the boiling wort does that job but this time, doing a half size batch the whole thing isn't covered by the boiling wort. I just wanted to be sure :)
Heat off and, according to this particular home brewing book you let the wort stand for five minutes before adding the aroma hops.
Follow the link for Part 4, The Aroma Hops & Wort Chilling.
 |
| The sweet wort approaching boil |
 |
| Rolling boil reached the bittering hops were added. |
Getting towards the end of the 60 minute boil time the boiling wort is beginning to clear, the hops continue to tumble around but something is definitely happening here...
 |
| About 15 minutes from the end of the wort boil. |
 |
| Wort chiller added 10 minutes before end of boil to sterilize it, copper finings (finings for the copper, they're seaweed, not made from copper) added 5 minutes before end of boil. |
Heat off and, according to this particular home brewing book you let the wort stand for five minutes before adding the aroma hops.
Follow the link for Part 4, The Aroma Hops & Wort Chilling.
First Brew Day - Sparging The Mashed Grist
Continuing on from Part One, Mashing the grist... (please excuse the change of tenses as you read on, some of this was posted as it happened and some, like this bit, has been added later.)
Well the mash didn't go too bad I think, final temp in the mash tun was 58C though so I'm a bit worried about that. Not sure what the minimum is, all my books etc say keep it around 65C...
Could everything have gone wrong already? During the mash time I weighed out my hops, had a clean round and sterilized my fermentation bin, hydrometer etc
At the end of the mash I cracked open the valve and a drained about 2 litres of wort into a jug until it ran clearer before allowing the rest to drain into a fermenting bucket - just to hold it until the hot liquor tanks hot water has been used up by sparging.
The wort will end up in the HLT that will then become my boiler or copper as it's called. A lovely coloured liquid ran forth and my home made mash tun drained really well. Once the out flow had dropped to a very slow trickle I tipped the tun slightly to get more wort.
I waited a few more minutes and then connected to hot liquor tank to the stub on the top of my mash tun that feeds the internal, sparging spray bar.
My home made sparging device is working well, nice slow, gentle trickle over the mash surface.
Please note, the photo above is from my test set up last night. The photo I took of sparging today has thrown up a fault and won't open in photoshop :(
Sparging liquor temp is 75C and I have about 3 litres left to go...
Hey up! I just found another pic of the sparging process...
See you soon. Follow the link for part 3, Boiling the Wort and adding the Bittering Hops
Well the mash didn't go too bad I think, final temp in the mash tun was 58C though so I'm a bit worried about that. Not sure what the minimum is, all my books etc say keep it around 65C...
Could everything have gone wrong already? During the mash time I weighed out my hops, had a clean round and sterilized my fermentation bin, hydrometer etc
 |
| Bittering hops and aroma hops weighed out whilst waiting for the mash. |
 |
| The mashed grist prior to draining off before sparging. |
 |
| Sweet wort run off from the mash tun prior to sparging the mashed grist. |
My home made sparging device is working well, nice slow, gentle trickle over the mash surface.
 |
| Sparging the drained grist. This process rinses the grains that have been mashed in order to extract as much converted starch from the grains, converted starch = more fermentable sugar for the yeast to convert to alcohol... it's a bit more complex than that BTW. |
Sparging liquor temp is 75C and I have about 3 litres left to go...
Hey up! I just found another pic of the sparging process...
 |
| Hot liquor passes slowly through the mashed gist but this time you can see the run off from the mash tun into the collection bucket. |
First Brew Day
 |
| Bringing the mash liquor up to 72C, grist ready weighed out in bucket next to my hobs. |
The beer: Brewer's Pride taken from page 111 of this book, Home Brewing Self Sufficiency
I'll be adding to this post through the day, or at least I'll try! I'll give all the weights and water volumes etc at the end of the post.
 |
| Adding 4l of liquor at 72c to the mash tun before adding the grist, stirring and then adding a further 3l of liquor. I didn't get round to taking pics of the mash due to the temp drop causing me to have to speed things up somewhat. |
Mash liquor was going into my mash tun at 72C but the grist cooled it more than I expected and it was down to 62C even with an additional 1/2 kettle of boiling water by the time the lid went on. All covered up now and resting.
I pre-warmed the mash tun with hot water too! When I tested the mash tun just with hot water the other day it held its temp very well even without additional insulation which I'm using today (a sleeping bag and large blanket.).
 |
| Mash tun wrapped in a sleeping bag and blanket. I also pushed some sheets of polystyrene around the tun yet it still lost temp more than I'd have liked... bugger! |
Next time I'll warm the liquor to 80, bearing in mind this is a half size brew due to my stock pot I'm using as my copper/boiler turning out to hold 10 litres less than it is stamped as holding FFFUUUUU!
More soon... follow this link for the next part of today's brew - sparging the mashed grist
Friday, July 29, 2011
First Brew Day Preparation!
Well there's nothing left to hold me back now so tomorrow shall be brew day 1!
I am hoping I am organised enough to be able to blog/tweet it in real time as it happens so watch this space!
I am hoping I am organised enough to be able to blog/tweet it in real time as it happens so watch this space!
Thursday, July 28, 2011
Vieira Stock Pans FFFUUUUUUUUUUU!!!!
Just filled my 34 litre stock pan that I converted into my boiler, copper in order to calibrate a dip stick as a stop gap to getting a sight glass fitted to the pan.
It was full at 24 litres!!!!!!!!11 The damn thing is even stamped 34 litres so it's not even some dickhead in the factory putting the wrong label on!

I guess I'll have to have a half brew for my first brew day :(

It was full at 24 litres!!!!!!!!11 The damn thing is even stamped 34 litres so it's not even some dickhead in the factory putting the wrong label on!
I guess I'll have to have a half brew for my first brew day :(
Home made Beer Wort Chiller - pt.2
AAAARRRGHHHHHHHHHHHHHH!!!!
Never again!!!!
After posting in part 1 of my home made wort chiller build, how easy the bending of the coil had been I then started fabricating a couple of strips with holes drilled in to act as a spacer for the coils to keep each coil about 10mm apart from its neighbours...
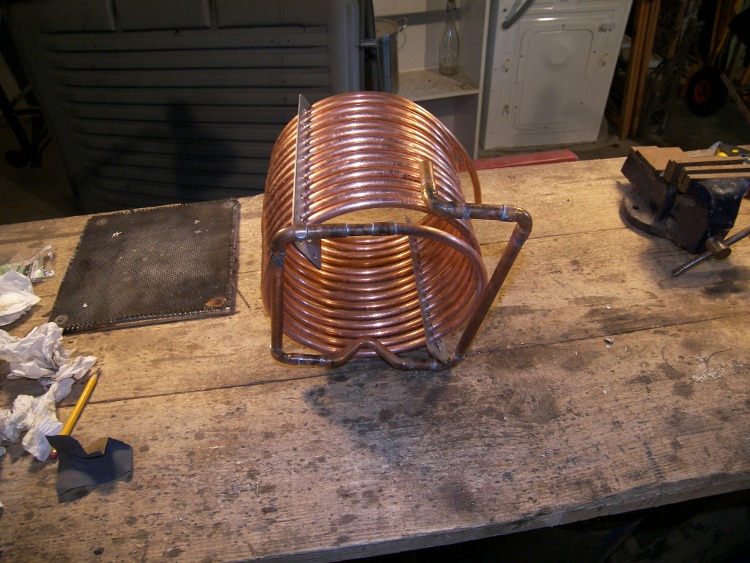
Imagine trying to simultaneously thread 15 needles with rigid thread and that's about the sheer, bloody buggeryness of it. So after the best part of three hours (including several swearing breaks) I ended up with this.
I have no idea if this was needed to be honest but my thinking is there's a larger surface area of chilled copper pipe exposed to the hot wort this way. Unsupported the weight of the coil squashes each coil flat down onto the one below. Lesson learned though for next time (AAARGGHHH) drill larger holes - I could only go up to 10mm as none of my drills will take a larger bit and then had to ream the holes to about 11mm which was hard work enough... Meh!
Anyway, it's finished bar the water connections... probably just hose clip the water pipe for this first brew directly onto the copper pipe stubs.
So here's a few piccies and even though it's an hour before what is typically, "aperitif" time I'm off to crack open a cold Perlenbacher!
After ageing several months fitting the support bars to my copper coil, I began assembling the rest of the wort chiller. My design idea was to have a stable base that is a part of the coolant circuit but avoid any contact with the hop filter in the bottom of the brewing boiler/copper.
After countless hours of plumbing during the renovation of our house I have become reasonably good at soldering. Maybe not the best looking soldering but 99% leak free, which is nice.
If you noticed the bend/kink in the base pipework in the last but one photo, it's there to bridge the hop filter that is fitted into the base of my brewing boiler/copper without touching it and possibly blocking some holes. You can see it doing its thing below.
All in all this has been the toughest project to date in the building of my brewing equipment but for me the benefits of full mashed, all grain home brewed beer makes it worth it. Having a plumber mate has certainly helped keep the cost down and I reckon the whole wort chiller has cost less than 30 quid.
If you missed it you can follow this link for Part 1 of building my own wort chiller.
Never again!!!!
 |
| My home made beer wort chiller in place in my brewing boiler/copper |
 |
| The first few coils went well but then... FFFFUUUUUU!!!1!! |
 |
| Immersion chiller coils threaded into vertical spacer bars. Urgh! |
Anyway, it's finished bar the water connections... probably just hose clip the water pipe for this first brew directly onto the copper pipe stubs.
So here's a few piccies and even though it's an hour before what is typically, "aperitif" time I'm off to crack open a cold Perlenbacher!
After ageing several months fitting the support bars to my copper coil, I began assembling the rest of the wort chiller. My design idea was to have a stable base that is a part of the coolant circuit but avoid any contact with the hop filter in the bottom of the brewing boiler/copper.
 |
| Some bits of pipe badly soldered together. |
 |
| The base unit joined up with the cooling coil, note the bend in the pipe (the bit touching the bench)... |
 |
| And stood up! pretty stable so far. It's starting to look like a wort chiller. |
 |
| Wort chiller base avoiding contact with the hop filter (centre) |
 |
| My home made, immersion wort chiller in place in my brewing boiler. |
Home made Beer Wort Chiller
 |
| Copper pipe coiled and ready to fit to a base unit designed to support the wort chiller in the hot, hopped wort. Note the kink in the centre of the base, rear (left of pic)? That's there to clear the hop strainer in the base of my brewing copper (boiler). |
At one time the hot wort was allowed to cool overnight but this is:
a) very slow
b) a long time to leave the vulnerable liquid exposed to possible contamination
An immersion wort chiller is a simple coil of copper tubing that is placed in the hopped wort in the boiler a few minutes before the end of the boil (this sterilizes the tubing). Once the boil stage is finished, cold water is pumped through the chiller and a simple heat exchange takes place, the cold water is heated as it removes the heat from the hot, hopped wort. This can be quite a wasteful process so I am keen to develop it to use the minimum water and also a way to somehow re-use it - possibly pumped from one storage vessel to another via the copper coil and back again the next time it's used.
The initial hot water outflow from the chiller can be used for washing equipment.
My first, "worry" was how to bend the copper coil with a diameter larger than my boiler to a size small enough to fit in the boiler and also miss the pipework that acts as a hop filter... Hmmmm, I tried bending the end of the tube by hand but it seemed rock solid and considering it's meant to be "soft" it didn't seem so... bugger!
 |
| Base support for my home made Immersion Wort Chiller. The fatter pipe in the base is the hop filter leading to the external valve. I wanted to design a chiller base that would happily sit securely on the base of the boiler without interfering with the hop filter. |
I could delay no longer and had to at least try to bend the coil and so, in a moment of clear thinking, I screwed a 10mm pipe clip over the bottom end of the coil to stop the coil moving. I then placed a very technical tin of fence treatment in the coil and began to turn the coil, easing the part in contact with the tin around a bit at a time as shown below. (inset pic shows the support fix to the bench)
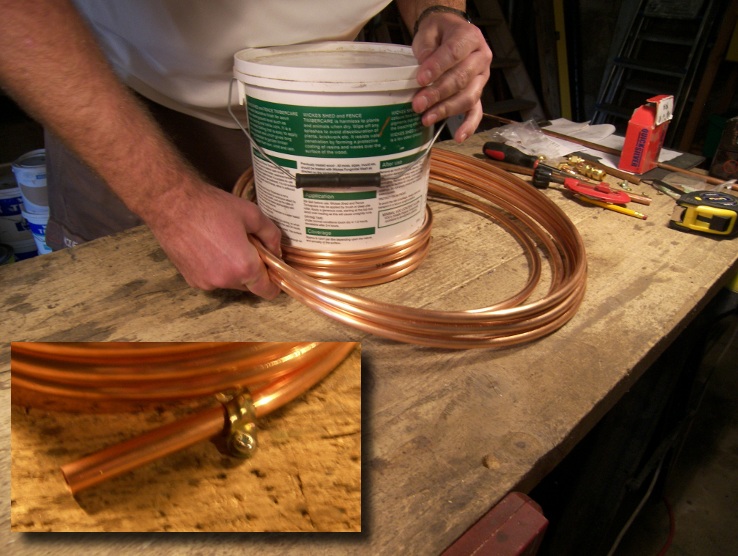 |
| Bending the copper pipe. The first coil was hardest to do as the tin kept trying to move, after that the first, new coil actually holds the tin in place and helps a great deal. |
 |
| <rawhide>Coiling, coiling, coiling. Keep that copper coiling!</rawhide> |

The bottom pipe will solder onto the base I made and the top will connect to either the outflow to waste or inflow from the cooling source. I am undecided as yet which way to run the chiller. Some brewers say cold in at the bottom, hot out at the top. Others say the opposite. At the end of the day it can run either way so I think I'll just do both and see which gives best results.
 |
| Almost finished. The upright facing elbow at the rear, right of the base will have along pipe attached for the water supply to connect to. |
I am just about to go and finish the chiller off so there should be an update later today.
Follow the link for PART 2 of building my own wort chiller.
Wednesday, July 27, 2011
Copper Coil for Wort Chiller arrived!!!
Yay! The 5m length of copper coil I ordered from my plumber friend, Christophe for making my wort chiller arrived yesterday afternoon. Even better though, the 5m I ordered turned out to be 10m, for the same price!!!
Of course it was only polite invite Christophe in for a beer or two. His wife turned up at 8 looking for him.
I've unpacked it this morning and even though it is meant to be soft it still feels very rigid and I think it's going to give me some problems trying to coil it into a narrower diameter, taller coil. As it is it's slightly too wide to fit my wort boiler. I might have to enlist Christophe further to help with bending the tubing, he's got a van full of plumbing goodies including various bending jigs, former and tools.
More soon, with pics.
[EDIT] The pipe bent very easily. I'll do a proper update tomorrow with some photos!
Tuesday, July 26, 2011
Vaulted Granite Cellar (Cave)
 |
| Our vaulted cellar. Originally done up for my growing wine collection but now I can't afford wine and my collection has dwindled, what better place to condition my home brewed beers... |
In a hole in the ground beneath our home was a dirty, wet and smelly cellar. For the first 3 years we ignored it, in the hope it would just go away. Realising that if it did, our house would collapse we began to refurbish it.
The original idea was it would just be a place to store a few items and at one end have a nice place to store my wine. All was well to begin with but for some reason when it rains, the water gets in through the stone steps (about half way down, through the ground) and so, clean and tidy as it now is, it still gets wet.
My wine collection has dwindled to the point of not really being a collection any more, more of a slight gathering but it's a beautiful cellar - lovely and cool in the summer and warm in the winter.
 |
| The dashing and incredibly handsome me with my wine, now gone :( |
I think the clay floor can be tidied up with a layer of gravel. I can't concrete it because it would become a subterranean pond - unfortunately we know a few expats who did exactly that and then had to smash their new concrete cellar floors out.
My biggest concern is the damp and right now I don't really know how to proceed. For now though it's a great place to shove the wife out of the way when she starts playing up.
 |
| The present wife in our hobbit hole... I mean cellar. |
Building My Brewery In The Barn
 |
| Our barn with entrance to the right. The mezzanine floor where the brewery is to be built is to the left. The opening at the left hand side of this picture is the access to our wood store that is underneath it. |
Until a few days ago the mezzanine has mostly been a dumping ground for accumulated bits and bobs so I began tidying it up.
My plan to to build an enclosed area with a simple, lightweight roof up on the mezzanine. I think I can comfortably end up with a 12' x 8' area that should be plenty for the brewery, storage and fermentation cupboard.
I'll need to run a cold water feed which isn't a problem and the barn is already supplied with mains electricity.
The floor of the mezzanine is wood beams packed with slats and about 3" of hard clay. Above this (screwed down to the wooden beams) is a chipboard floor that we fitted 3 or 4 years ago.
 |
| Steps up to the mezzanine floor. |
 |
| Insulated base of the fermenting cupboard. |
Above the insulation is 18mm of chipboard. Once the cupboard is built I think I'll line it with something easily washable, either lino or maybe some plastic lambris - I forget what it's called in English.
 |
| The insulated fermenting cupboard base. |
The copper will empty to the fermenting vessel at floor level. I found a couple of wheeled dollies that will nicely take a standard fermenting bin and help with moving the filled fermenter over to the fermenting cupboard.
This is going to be a work in progress for some time, budget is a factor so I am trying to make as much as I can with various bits left over from our other projects during the renovation of the properties.
Watch this space for part two...
Monday, July 25, 2011
Beer Wort Chiller - Copper Coil Ordered
 |
| Immersion Type Beer Wort Chiller used in Full Grain Brewing |
After a lot of looking for a 5 metre coil of 10mm copper pipe and getting disillusioned with a) the price and (b) the rarity of 10mm coils my mate and neighbour, Christophe has got back to me with a quote for the beast at just under 18 euros!!! That's a fair bit more than half of the price I've seen elsewhere.
It turns out his Dad is a plumber who does a lot of brewery fitting! Niiiiice :)
So, the last of my equipment items should be ready within a few hours of it arriving. The design itself is very simple. Cold water passes through the copper coil which is immersed in the hot wort (the unfermented beer, the result of mashing and sparging the malted grains) and lowers the temperature from just below boiling to around 20C so that the yeast can be added.
Add the yeast to the wort when it's hot and it'll kill it.
The wort can be allowed to cool naturally but it can take up to 24 hours which is along time for the (at this stage) very delicate beer to possibly end up in contact with nasties that can easily ruin the whole batch of beer.
So, cool the wort quick, get the yeast in and get it covered!
However, as is my way, I've been toying with another way of doing it...
In order to bring the temperature of the wort from 100C to around 30C requires, on average, the cold water passing through the immersion chiller for upwards of 20-30 minutes. This is along time to have a cold tap running. the initial water exiting the chiller is hot, the transferred heat from the wort the chiller is immersed in, and can be used for washing equipment etc but only a few gallons.
It seems to me in this day of sustaining resources and increasing utility bills, an awful waste of water. I suppose water butts for the garden could be filled but we have a well*so our gardening water is free, no need to run a tap.
I thought instead, what if I pass the hot wort through the coil (rather than the cold water) and instead of immersing the coil in my copper/boiler I immerse it in a large bucket of cold water. Large enough to hold a decent volume of water so it doesn't warm up quickly and also large enough to have a series of frozen 2litre bottles of water placed in to keep re-chilling the surrounding water.... It might just work dammit!
When used the traditional way, the immersion chiller is placed into the boiling wort ten minutes or so before the end of boil to sterilize it. in my case this would be lacking so I would have to sterilize the coil in a large pan of boiling water first. In my case, only the inside of the pipe would be in contact with the hot wort so to be safe, first I'll sit it in a bath of liquid sterilizer, give it a good rinse then boil it.
Just got to wait for the dagnamming thing to arrive now.
*Although we have a well, I have not had the water tested. It smells a bit rough when first pumped out so I don't fancy risking using it anywhere near my beer... Just in case you were thinking I could pump well water (very cold) through my chiller.
Thursday, July 14, 2011
Last few items and first ingredients ordered.
Unfortunately the last few days have seen me having to get some "proper work" done and so my brewing project has been on hold. However I have ordered the remaining kit required, stuff that I can't make myself eg the fermenting bins, thermometer, hydrometer etc
I have also ordered a selection of malted grains (ready crushed), adjuncts and hops:
Pale Malt
Amber Malt
Crystal Malt
Torrefied Wheat - useful in aiding the head formation and retention.
East Kent Goldings Hops
Northern Brewer
Fuggles
Cascade
I am waiting for confirmation of the overseas shipping charge but unless it's way different to what I was quoted by the supplier (I'll hold off naming names until I've been impressed by the service) it should be ok. My initial contact with the supplier has been very positive, helpful and polite.
In the meantime I am going to look at making a wort chiller although I am a bit wary about pumping gallons of cold tap water to waste - some of the heated water (cold to begin with but exchanging heat with the hot wort) can be used for washing equipment etc but... well, it seems to me that in this time of water management I may have to come up with an alternative solution.
Watch this space.
Next post should hopefully be my first brew :)
Sunday, July 10, 2011
Hop strainer and mash tun filter changes...
With regard to the filter systems I built into first my mash tun and then my dual purpose boiler/copper I have had some great feedback from a couple of fellow brewers on Jim's Beer Kit forum.
Whereas I had drilled holes all the way around the piping, I would have been better just to drill the lower sides and bottom of the pipework.
The slotted filter in the mash tun isn't such a problem as all I need to do with that is simply turn the pipework over - another reason I chose not to permanently fix all the parts together just yet.
This isn't so much a case of the filtration not working but the dead space or rather the amount of liquid that would be left behind after draining and in effect, wasted. Less dead space = more beer at the end of the day.
Saturday, July 9, 2011
Sparging System for Home Made Mash Tun
 |
| Spray bar for sparging the drained, mashed grist |
So, instead for starters I have chosen to build a static spray bar, albeit one that hopefully covers most of the surface area of the mashed grist.
The connector on the top will have a pipe from the aluminium boiler fixed on and hot water will be allowed to slowly trickle onto the drained grist, sparging it. The drain tap will be open from the start of the sparging process and the sparged liquid (I really do need to remember the proper terms) will flow into the previously drained wort.
Once sparged the mash tun has finished it's job. The liquid wort plus sparged liquid will then be added to the empty boiler and brought back to the boil ready for the addition of hops and any adjuncts (other flavour ingredients eg rice) required in the recipe.
Just a quicky post really, the spray bar is all 14mm copper pipe that has been drilled every 40mm, I may drill additional holes between the current ones if need be. I have purposely angled the spray bar stages downwards with a total drop from the water entry point to the end of the bar of about 40mm. this may or may not help the sparging liquor flow better and reach the last few holes.
 |
| Home made mash tun with sparging system and brewing boiler/copper for my first foray into full grain brewing |
Building My First Home Brewing Boiler
10th July - I have amended some details. See this post re grist filter & hop strainer
For brewing using the full, malted grain and hops method we need hot water and quite a lot of it. Not only that but after the wort (the raw unfermented beer if you like) has been mashed and sparged (see my post about building my first mash tun) it is then brought back up to the boil (the boiler becoming the copper) before the bittering hops and later, the aroma hops and any other adjuncts are added.
For my first foray into the world of full grain homebrewing I shall be heating my boiler simply using a gas burner. Although I see how much more practical it is to have a heating element within the boiler itself I can see that bringing a large volume of water to temperature and sustaining it at a rolling boil for an hour or more would be quite costly on the old leccy bill... I haven't dismissed it and my plan is to ultimately work a heater into this setup, but for now...
34l (7.5 gallons-ish) stock pot with a nice fitting lid
Tank connector
Valve - to act as my tap
14mm (note: I may increase the size of this*) copper pipe
5x 14mm 90deg elbows
1x 14mm T
2x silicon fairy cake moulds LOL - I cut the bases out to make two heat resistant washers to seal the valve fitting.
Tools:
Pipe cutter - you can use a hack saw but you might have to file the rough edges.
Hand drill
Pedestal drill
Spanner (for tightening the valve against the wall of the boiler)
3mm drill bit
10mm drill bit
Steel reamer (I haven't got a drill bit large enough to drill the stock pot wall to 20mm for the valve/tank connector)
Steel countersink bit
PTFE tape, for the valve to seal onto the tank connector pipe - it leaked like a bugger during my mash tun building.
Hand vice, not sure what it's really called but you clamp the pipe in it when drilling the drain holes.
Center punch
Flat file
Round file
Wire wool
*I decided that I'd like the internal plumbing to be interchangable - the 14mm piping set up can be removed and swapped for a larger bore 18mm single pipe with larger diameter holes drilled. Why? To my thinking the initial boil is just fresh water and from the boiler to the mash tun we need to get the hot water in there quickly hence the 18mm large hole piping. However, after mashing comes the sparging which requires a slower flow (yes I suppose it can be controlled by the valves but the ones I have are a little bit ON or OFF with even the halfway cracked point being virtually off.) and then after boiling the wort and adding hops the brew need transferring to the fermenting vessel and one thing I remember about brewing from kits in the past is that if the brew flows fast you quickly end up with a frothy mess that you have to wait ages for to settle. I want it to be fairly quick process all in all.
My first task was to drill the boiler wall for fitting the valve.
Not having a drill bit larger than 14mm and needing a hole size of at least 20mm, I had to first drill a 3mm pilot hole, then up it to 10mm so I could get my reamer in and then carefully ream out the hole until the tank connector (threaded brass pipe) could turn in.
I purposely wanted it tight to aid with the seal as much as possible.
The reaming was quite a steady job, it's easy to go too fast and end up with an oval hole... this is a bad thing.
Next came the fitting of the tank connector and valve. I had pondered about how to seal this without using rubber washers as surely they could impart some dodgy flavourings/smells (this I don't know for sure so please do comment if you know) and I wasn't sure they'd stand up to the heat for long.
The result was surprisingly <bil-and-ted>most excellent dude!</bill-and-ted> the locking nut on the inside tightened up and pulled the valve assembly tightly against the wall superbly. I did use a silicon washer inside and out - although theoretically there should be no need to use one on the outside. All my life when it has involved water or liquids and plumbing I have been plagued by leaks so, f**k it! 2 washers.
Some text here to stop the next picture shooting up to the top of this post... WTF!!!
Right, now comes the fiddly bit... The filter. Using the 14mm elbows, T and pipe make the following device.
The sizes above are to fit, as you'll see below, into my 34l stock pot. Maybe it's a bit over the top but I basically wanted a low level drain that would sit on the floor of the brewing boiler. The fact the tap is about 80mm up the side of the boiler means I needed some way of getting the liquid below that level out.
Once all your pipes are marked - NOTE you only have to mark twice as detailed above because when you drill it, the bit will pass through the pipe and take care of the opposite sides anyway - take a center punch and tap each mark - this will stop the drill bit dancing around all over the surface of the pipe when you begin drilling the holes... lots of holes... oh my God so many holes!
So many holes :( Now, using a 3mm bit drill all those holes. it'll be as rough as hell no doubt and be careful handling the drilled pipes. Look out for burrs and rough edges.

And finally as this epic ramble draws to a close, fit it all together and hey presto...

For brewing using the full, malted grain and hops method we need hot water and quite a lot of it. Not only that but after the wort (the raw unfermented beer if you like) has been mashed and sparged (see my post about building my first mash tun) it is then brought back up to the boil (the boiler becoming the copper) before the bittering hops and later, the aroma hops and any other adjuncts are added.
For my first foray into the world of full grain homebrewing I shall be heating my boiler simply using a gas burner. Although I see how much more practical it is to have a heating element within the boiler itself I can see that bringing a large volume of water to temperature and sustaining it at a rolling boil for an hour or more would be quite costly on the old leccy bill... I haven't dismissed it and my plan is to ultimately work a heater into this setup, but for now...
34l (7.5 gallons-ish) stock pot with a nice fitting lid
Tank connector
Valve - to act as my tap
14mm (note: I may increase the size of this*) copper pipe
5x 14mm 90deg elbows
1x 14mm T
2x silicon fairy cake moulds LOL - I cut the bases out to make two heat resistant washers to seal the valve fitting.
Tools:
Pipe cutter - you can use a hack saw but you might have to file the rough edges.
Hand drill
Pedestal drill
Spanner (for tightening the valve against the wall of the boiler)
3mm drill bit
10mm drill bit
Steel reamer (I haven't got a drill bit large enough to drill the stock pot wall to 20mm for the valve/tank connector)
Steel countersink bit
PTFE tape, for the valve to seal onto the tank connector pipe - it leaked like a bugger during my mash tun building.
Hand vice, not sure what it's really called but you clamp the pipe in it when drilling the drain holes.
Center punch
Flat file
Round file
Wire wool
*I decided that I'd like the internal plumbing to be interchangable - the 14mm piping set up can be removed and swapped for a larger bore 18mm single pipe with larger diameter holes drilled. Why? To my thinking the initial boil is just fresh water and from the boiler to the mash tun we need to get the hot water in there quickly hence the 18mm large hole piping. However, after mashing comes the sparging which requires a slower flow (yes I suppose it can be controlled by the valves but the ones I have are a little bit ON or OFF with even the halfway cracked point being virtually off.) and then after boiling the wort and adding hops the brew need transferring to the fermenting vessel and one thing I remember about brewing from kits in the past is that if the brew flows fast you quickly end up with a frothy mess that you have to wait ages for to settle. I want it to be fairly quick process all in all.
 |
| 10mm hole drilled in my brewing boiler |
Not having a drill bit larger than 14mm and needing a hole size of at least 20mm, I had to first drill a 3mm pilot hole, then up it to 10mm so I could get my reamer in and then carefully ream out the hole until the tank connector (threaded brass pipe) could turn in.
I purposely wanted it tight to aid with the seal as much as possible.
The reaming was quite a steady job, it's easy to go too fast and end up with an oval hole... this is a bad thing.
 |
| Reaming the hole up to 20mm for the tank connector |
With perfect timing I stumbled upon a thread on the superb Jim's Beer Kit forum about using cut up silicon baking sheets to use as heat resistant washers! Genius!!!
Rather than risk the wrath of the current wife by chopping up one of her sheets, I nicked 2 silicon fairy cake cases and legged it to the workshop.
 |
| With a little scissor action you too can ruin 2 perfectly good fairy cake cases. |
 |
| The valve fitted and sealed with a fairy cake case washer. |
 |
| Inside sealed up lavverly jabberly! |
 |
| 14mm Copper Pipe Filter for Homebrewing Brew Boiler (undrilled) |
 |
| The filter (undrilled) fitted into the base of the brewing boiler |
Also, come the time it has boiled wort (I will gradually learn the real terms for these things) and hops in there I want as many exit holes as possible to avoid blockages when draining it to the fermentation vessel.
Now comes the really tedious bit, drilling the drain holes. Lot's of them. I marked the visible parts of each pipe ie the bits that aren't pushed into the elbow and T fittings 10mm apart and then turn the pipe 1/4 turn and marked again at 10mm points but staggered between the first marks as shown rather badly below...
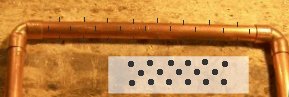 |
| The rather grotty drawing shows markings for the staggered holes, if the pipe were rolled out flat. |
 |
| Center punch the marked pipes ready for drilling. |
HANDY HINT ALERT!!!

Use a steel countersink to de-burr the copper pipe. It not only takes the sharp edges off, it gives a nice looking bevel to the edge of the hole too. {applause} Thank you very much, I'm here all week!
After several months of drilling, de-burring, filing the inside burrs off with a round file and finally finishing with steel wool you'll have something a little like these.
 |
| Holey, shiny copper pipes Batman! |

As I mentioned towards the start of this post I am also making a larger bore (no not me) version using 18mm pipe.
Still to do with this device:
Fit a thermometer - I want one of those groovy looking, steampunk dial types that stick out of the front like weird looking eye clock thing.
Fit a heater... maybe. We'll see what gas bill/electric bill comparisons are like.
Fit a graded sight glass thing for use during the liquor (water) boiling so I can see the liquid level without having to take the lid off and accurately dispense the hot liquor when mashing and sparging.
Subscribe to:
Comments (Atom)