Showing posts with label brewing equipment. Show all posts

Thursday, July 28, 2011

Home made Beer Wort Chiller

Copper pipe coiled and ready to fit to a base unit designed to support the wort chiller in the hot, hopped wort. Note the kink in the centre of the base, rear (left of pic)? That's there to clear the hop strainer in the base of my brewing copper (boiler).
Further to my post yesterday I have a few photos taken during the building of my immersion chiller. Quick re-cap the chiller is used to rapidly cool the boiled wort with bittering hops and later aroma hops to a temperature suitable for pitching (adding) the yeast. If the wort is too hot it will simply kill the yeast.

At one time the hot wort was allowed to cool overnight but this is:

a) very slow
b) a long time to leave the vulnerable liquid exposed to possible contamination

An immersion wort chiller is a simple coil of copper tubing that is placed in the hopped wort in the boiler a few minutes before the end of the boil (this sterilizes the tubing). Once the boil stage is finished, cold water is pumped through the chiller and a simple heat exchange takes place, the cold water is heated as it removes the heat from the hot, hopped wort. This can be quite a wasteful process so I am keen to develop it to use the minimum water and also a way to somehow re-use it - possibly pumped from one storage vessel to another via the copper coil and back again the next time it's used.

The initial hot water outflow from the chiller can be used for washing equipment.

My first, "worry" was how to bend the copper coil with a diameter larger than my boiler to a size small enough to fit in the boiler and also miss the pipework that acts as a hop filter... Hmmmm, I tried bending the end of the tube by hand but it seemed rock solid and considering it's meant to be "soft" it didn't seem so... bugger!

Base support for my home made Immersion Wort Chiller. The fatter pipe in the base is the hop filter leading to the external valve. I wanted to design a chiller base that would happily sit securely on the base of the boiler without interfering with the hop filter.
While I pondered how to bend the copper pipe neatly and without kinking it I began knocking up the base shown above.

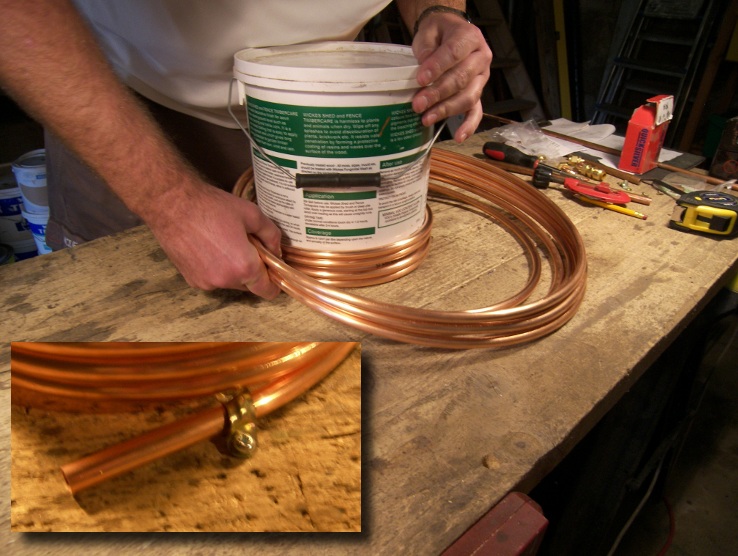
I could delay no longer and had to at least try to bend the coil and so, in a moment of clear thinking, I screwed a 10mm pipe clip over the bottom end of the coil to stop the coil moving. I then placed a very technical tin of fence treatment in the coil and began to turn the coil, easing the part in contact with the tin around a bit at a time as shown below. (inset pic shows the support fix to the bench)

Bending the copper pipe. The first coil was hardest to do as the tin kept trying to move, after that the first, new coil actually holds the tin in place and helps a great deal.
All in all it took about 5 or 6 minutes to bend the coil. At first it was quite aukward as pulling the pipe around the tin was making the tin move. After the first coil had wrapped around the tin though it held it in place and the rest followed quite easily. I was very surprised at how easy it was, I was expecting it to be a total pig and this is something I've been putting off doing for that reason.

<rawhide>Coiling, coiling, coiling. Keep that copper coiling!</rawhide>
After a few minutes this is what I ended up with. Niiiiice.


The bottom pipe will solder onto the base I made and the top will connect to either the outflow to waste or inflow from the cooling source. I am undecided as yet which way to run the chiller. Some brewers say cold in at the bottom, hot out at the top. Others say the opposite. At the end of the day it can run either way so I think I'll just do both and see which gives best results.

Almost finished. The upright facing elbow at the rear, right of the base will have along pipe attached for the water supply to connect to.
Looking at how the copper pipe collapses back down onto itself in a tight coil I think I might get some stainless steel strips, or aluminium and drill 11mm holes spaced evenly. thread the tub through the vertical, drilled strips and they'll space the copper tubing allowing a greater surface area of contact with the hot, hopped wort.

I am just about to go and finish the chiller off so there should be an update later today.

Follow the link for PART 2 of building my own wort chiller.

Wednesday, July 27, 2011

Copper Coil for Wort Chiller arrived!!!

Yay! The 5m length of copper coil I ordered from my plumber friend, Christophe for making my wort chiller arrived yesterday afternoon. Even better though, the 5m I ordered turned out to be 10m, for the same price!!!

Of course it was only polite invite Christophe in for a beer or two. His wife turned up at 8 looking for him.

I've unpacked it this morning and even though it is meant to be soft it still feels very rigid and I think it's going to give me some problems trying to coil it into a narrower diameter, taller coil. As it is it's slightly too wide to fit my wort boiler. I might have to enlist Christophe further to help with bending the tubing, he's got a van full of plumbing goodies including various bending jigs, former and tools.

More soon, with pics.

[EDIT] The pipe bent very easily. I'll do a proper update tomorrow with some photos!

Saturday, July 9, 2011

Building My First Home Brewing Boiler

10th July - I have amended some details. See this post re grist filter & hop strainer

For brewing using the full, malted grain and hops method we need hot water and quite a lot of it. Not only that but after the wort (the raw unfermented beer if you like) has been mashed and sparged (see my post about building my first mash tun) it is then brought back up to the boil (the boiler becoming the copper) before the bittering hops and later, the aroma hops and any other adjuncts are added.

For my first foray into the world of full grain homebrewing I shall be heating my boiler simply using a gas burner. Although I see how much more practical it is to have a heating element within the boiler itself I can see that bringing a large volume of water to temperature and sustaining it at a rolling boil for an hour or more would be quite costly on the old leccy bill... I haven't dismissed it and my plan is to ultimately work a heater into this setup, but for now...

34l (7.5 gallons-ish) stock pot with a nice fitting lid
Tank connector
Valve - to act as my tap
14mm (note: I may increase the size of this*) copper pipe
5x 14mm 90deg elbows
1x 14mm T
2x silicon fairy cake moulds LOL - I cut the bases out to make two heat resistant washers to seal the valve fitting.

Tools:
Pipe cutter - you can use a hack saw but you might have to file the rough edges.
Hand drill
Pedestal drill
Spanner (for tightening the valve against the wall of the boiler)
3mm drill bit
10mm drill bit
Steel reamer (I haven't got a drill bit large enough to drill the stock pot wall to 20mm for the valve/tank connector)
Steel countersink bit
PTFE tape, for the valve to seal onto the tank connector pipe - it leaked like a bugger during my mash tun building.
Hand vice, not sure what it's really called but you clamp the pipe in it when drilling the drain holes.
Center punch
Flat file
Round file
Wire wool

*I decided that I'd like the internal plumbing to be interchangable - the 14mm piping set up can be removed and swapped for a larger bore 18mm single pipe with larger diameter holes drilled. Why? To my thinking the initial boil is just fresh water and from the boiler to the mash tun we need to get the hot water in there quickly hence the 18mm large hole piping. However, after mashing comes the sparging which requires a slower flow (yes I suppose it can be controlled by the valves but the ones I have are a little bit ON or OFF with even the halfway cracked point being virtually off.) and then after boiling the wort and adding hops the brew need transferring to the fermenting vessel and one thing I remember about brewing from kits in the past is that if the brew flows fast you quickly end up with a frothy mess that you have to wait ages for to settle. I want it to be fairly quick process all in all.


10mm hole drilled in my brewing boiler
My first task was to drill the boiler wall for fitting the valve.

Not having a drill bit larger than 14mm and needing a hole size of at least 20mm, I had to first drill a 3mm pilot hole, then up it to 10mm so I could get my reamer in and then carefully ream out the hole until the tank connector (threaded brass pipe) could turn in.

I purposely wanted it tight to aid with the seal as much as possible.

The reaming was quite a steady job, it's easy to go too fast and end up with an oval hole... this is a bad thing.

Reaming the hole up to 20mm for the tank connector
Next came the fitting of the tank connector and valve. I had pondered about how to seal this without using rubber washers as surely they could impart some dodgy flavourings/smells (this I don't know for sure so please do comment if you know) and I wasn't sure they'd stand up to the heat for long.

With perfect timing I stumbled upon a thread on the superb Jim's Beer Kit forum about using cut up silicon baking sheets to use as heat resistant washers! Genius!!!

Rather than risk the wrath of the current wife by chopping up one of her sheets, I nicked 2 silicon fairy cake cases and legged it to the workshop.

With a little scissor action you too can ruin 2 perfectly good fairy cake cases.
The result was surprisingly <bil-and-ted>most excellent dude!</bill-and-ted> the locking nut on the inside tightened up and pulled the valve assembly tightly against the wall superbly. I did use a silicon washer inside and out - although theoretically there should be no need to use one on the outside. All my life when it has involved water or liquids and plumbing I have been plagued by leaks so, f**k it! 2 washers.

The valve fitted and sealed with a fairy cake case washer.
Some text here to stop the next picture shooting up to the top of this post... WTF!!!

Inside sealed up lavverly jabberly!
Right, now comes the fiddly bit... The filter. Using the 14mm elbows, T and pipe make the following device.

14mm Copper Pipe Filter for Homebrewing Brew Boiler (undrilled)
The sizes above are to fit, as you'll see below, into my 34l stock pot. Maybe it's a bit over the top but I basically wanted a low level drain that would sit on the floor of the brewing boiler. The fact the tap is about 80mm up the side of the boiler means I needed some way of getting the liquid below that level out.

The filter (undrilled) fitted into the base of the brewing boiler
Also, come the time it has boiled wort (I will gradually learn the real terms for these things) and hops in there I want as many exit holes as possible to avoid blockages when draining it to the fermentation vessel.

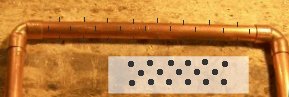
Now comes the really tedious bit, drilling the drain holes. Lot's of them. I marked the visible parts of each pipe ie the bits that aren't pushed into the elbow and T fittings 10mm apart and then turn the pipe 1/4 turn and marked again at 10mm points but staggered between the first marks as shown rather badly below...
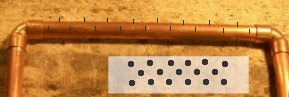
The rather grotty drawing shows markings for the staggered holes, if the pipe were rolled out flat.
Once all your pipes are marked - NOTE you only have to mark twice as detailed above because when you drill it, the bit will pass through the pipe and take care of the opposite sides anyway - take a center punch and tap each mark - this will stop the drill bit dancing around all over the surface of the pipe when you begin drilling the holes... lots of holes... oh my God so many holes!

Center punch the marked pipes ready for drilling.
So many holes :( Now, using a 3mm bit drill all those holes. it'll be as rough as hell no doubt and be careful handling the drilled pipes. Look out for burrs and rough edges.

HANDY HINT ALERT!!!

Use a steel countersink to de-burr the copper pipe. It not only takes the sharp edges off, it gives a nice looking bevel to the edge of the hole too. {applause} Thank you very much, I'm here all week!

After several months of drilling, de-burring, filing the inside burrs off with a round file and finally finishing with steel wool you'll have something a little like these.

Holey, shiny copper pipes Batman!
And finally as this epic ramble draws to a close, fit it all together and hey presto...


As I mentioned towards the start of this post I am also making a larger bore (no not me) version using 18mm pipe.

Still to do with this device:

Fit a thermometer - I want one of those groovy looking, steampunk dial types that stick out of the front like weird looking eye clock thing.

Fit a heater... maybe. We'll see what gas bill/electric bill comparisons are like.

Fit a graded sight glass thing for use during the liquor (water) boiling so I can see the liquid level without having to take the lid off and accurately dispense the hot liquor when mashing and sparging.




Friday, July 8, 2011

Building My First Mash Tun

10th July - I have amended some details. See this post re grist filter & hop strainer
Components for my first, full grain Home Brewing Mash Tun
What is Mashing and what is a Mash Tun?
Extract about Mashing Malted Grains from Wikipedia:
Mashing is the process of combining a mix of milled grain (typically malted barley with supplementary grains such as corn, sorghum, rye, rice or wheat), known as the "grist" or "grain bill", and water, known as "liquor", and heating this mixture. Mashing allows the enzymes in the malt to break down the starch in the grain into sugars, typically maltose to create a malty liquid called wort. There are two main methods - infusion mashing, in which the grains are heated in one vessel; and decoction mashing, in which a proportion of the grains are boiled and then returned to the mash, raising the temperature.[2] Mashing involves pauses at certain temperatures (notably 45 °C, 62 °C and 73 °C), and takes place in a "mash tun" - an insulated brewing vessel with a false bottom. The end product of mashing is called a "mash".
For my first mash tun I was going to create a false bottom using a perforated, stainless steel plate fitted snugly into the bottom of my insulated container (a Thermos cool box) leaving sufficient space below for the drain and valve that allows the liquid wort to be drawn off, leaving the mashed grist behind, ready for sparging. Sparging comes after the initial mash and is basically slowly pouring hot water over the drained grist to extract further loveliness into the wort... more on this at a later date.

However, stainless steel is not cheap and the insulated container has curved sides and ends that would making cutting (or having cut) a sheet quite aukward. Instead I opted to make a filter using everyday, copper plumbing fittings and pipe, slotted to allow the wort to pass through and onto the outlet drain and tap whilst retaining the mashed grist.

Also, to keep things initially, "simple" I have not fitted a heating element. Instead I shall add water boiled in a separate 34l stock pan to the grist in my mash tun.

So began my first venture, fully expecting a series of FFFFFFUUUUUUUUU rage inducing balls ups as is normal in my D.I.Y

My first task was to drill a 20mm hole through the insulated wall of my container. Through will be pushed a length of threaded, brass pipe with a plastic washer sealed locking nut on the inside and standard rubber washer on the outside of the box. The valve will be fitted to the outside and the copper filtration system fitted to the inside.

20mm hole drilled into cool box wall.
I inserted the threaded brass pipe - which was a nice, tight fit - through the hole and secured it on the inside and outside with 2 locking nuts and washers to seal it all up.

Brass pipe secured in place and ready to take the mashed grain filter
Rather than show all of the stages, making the internal grain/grist/mash filter I'll just show the finished component. It's composed of:
  • 18mm Copper pipe - approx. 500mm
  • 4x 18mm 90deg elbows
  • 1x 18mm T
  • 18mm coupling (not sure what it's called, tank union possibly) with a female, threaded end that tightens on to the projecting stub of the threaded brass pipe.
I cut slots roughly 10mm apart and through about half the diameter of the copper pipe and push fitted it all together. I have not soldered any of it. I'll see how it behaves during the first brew and if it comes apart will consider probably joining it all together with a series of good, centre punch wallops on the ends of the fittings. I hope it's ok as it is as I'm sure it will be easier to clean out after use if it's able to be broken apart.

Home made mash filter ready to connect into my mash tun
Once I had it all cleaned up and connected, I fitted the valve onto the outside and gave it a good tighten. now came the important part, would it leak? I filled the mash tun with cold water and waited...

Mash tun filled with water to test for leaks... seems ok so far.
There was a slight drip from the valve side of things, FFFFFUUUUUUUUU- so I fitted and internal washer, wrapped some PTFE tape around the thread (I should have known - after a lot of plumbing during the refurbishment of our house in France, that everything you buy for plumbing these days leaks - and done this in the first place) and re-fitted the valve. After a further water test there was no sign of any leak :)

My home made, full grain home brewing mash tun (version 1)
I think I will still look at creating a mash tun using a false bottom but I'm sure this will get me started with my first few brews. Now it's just a case of sourcing a good supplier that won't take my eyes out with postage costs.

I've joined a couple of good home brewing forums, Jim's Beer Kit and a French one, Brassage Amateur both of which I have found invaluable and a pleasant bunch of members to boot!