Showing posts with label DIY. Show all posts

Friday, August 31, 2012

STC1000 Controlled Fermenting Cabinet

Front view all sealed up
I have come to the conclusion that Larder Fridges (the tall ones with no built in freezer) are like the proverbial Rocking Horse shit here in France.

I've been trying to get hold of one or two, secondhand fridges to convert into Fermenting Cabinets.

You may be familiar with the concept of an FV Cabinet or you may not so in case you don't know here's a quick explanation.

Yeast performs better at certain temperatures and if the temperature of the environment in which the FV is located varies the yeast can do funny things. Fermentation times can vary, flavours can develop differently and well... generally it takes away another level of consistency when trying to reproduce recipes.

So, take a fridge for cooling, a small heater - for heating and wire the two into an external temerature controller such as the STC-1000

Place the heater in the bottom of the fridge and your FV on a shelf above - probably advisable to build your own shelving system to fit in the fridge.

The controller is set to eg 18C and if the sensor (supplied with a nice long wire) in the fridge detects it is warmer than that it'll switch the fridge on... If the temp drops too low the STC1000 will switch the heater on. Because the fridge walls are insulated neither the fridge or heater have to run for long to keep a perfectly stable temperature for your yeast.

My dilemma was I couldn't find a suitable fridge, so I used a smaller, old one and built a large extension for it from PU Foam insulation panels.

MK1


Under construction. The PU foam screws together easily using some flat headed decking type screws. A steel rule, sharp knife and a tape measure. The foam cuts easily and cleanly.

Rear view, the old fridge built into the back. Temp reading 21.6 and the cooling light is on as the fridge brings the temp down to 18.5C. Alesis DM10 electronic Drumkit is not part of the set up :)

Saturday, August 27, 2011

Home made Conical Fermenter project

A Conical Fermenter yesterday.
I've been looking at conical fermenters recently but the price has kept me away. All I really see is a pretty basic thing really, couple of valves, one for the beer take off I guess and the other - bottom one - for draining of the yeast sludge that settles out during fermentation... An airlock, possible even a sightglass but for a plastic one there's probably no need if you can see the liquid level ok through the tank wall.

How hard could it be to make one?

My Mrs pointed out the similarity between the fermenters I was looking at on The Google and a water dispenser we used to have for our chickens - we then got some Geese that promptly destroyed the dispenser. I've now found out they're call poultry drinkers and they look like this:

Plastic Poultry Drinker... A Conical Fermenter in the waiting.
A bit of cutting and drilling for a couple of valves and I think we'd have a pretty close deal and at around £35 (GBP) for a 30l drinker I could make four for the cost of a factory built fermenter. Looking at the photo above I'd need to find a drinker with a wider lid as to fit the valves there's a need to get an arm inside to tighten the back nut on.

Of course it's me and it's DIY so no doubt it'll go somewhat pear shaped but hey ho, that's half the fun isn't it? Hmmmmmn...

Tuesday, August 9, 2011

New Stock Pot - Time To Upgrade My Wort Boiler

After realising too late my stock pot I'd bought for my wort boiler was too small!!! Argghh! - (see this post about my supposed 34l wort boiler) - I have got hold of another, much larger one. Unforetunately I've got a very busy week ahead - the joys of freelance and no holidays - so I don't think I'll get it converted until next week.

Lessons learned from pan 1, I'll be fitting the hop strainer a bit lower in this one. Although when empty it syphons to virtually empty the interference of the hops around the filter caused my last brew to stop as I was draining it to the FV costing me around 500ml of hopped wort.

My existing wort chiller also still fits perfectly so no need for any adjustments there.

Watch this space for my second brew. in case you missed it, here's my first all grain home brew.

Thursday, July 28, 2011

Home made Beer Wort Chiller - pt.2

AAAARRRGHHHHHHHHHHHHHH!!!!

Never again!!!!

My home made beer wort chiller in place in my brewing boiler/copper
After posting in part 1 of my home made wort chiller build, how easy the bending of the coil had been I then started fabricating a couple of strips with holes drilled in to act as a spacer for the coils to keep each coil about 10mm apart from its neighbours...

The first few coils went well but then... FFFFUUUUUU!!!1!!
Imagine trying to simultaneously thread 15 needles with rigid thread and that's about the sheer, bloody buggeryness of it. So after the best part of three hours (including several swearing breaks) I ended up with this.

Immersion chiller coils threaded into vertical spacer bars. Urgh!
I have no idea if this was needed to be honest but my thinking is there's a larger surface area of chilled copper pipe exposed to the hot wort this way. Unsupported the weight of the coil squashes each coil flat down onto the one below. Lesson learned though for next time (AAARGGHHH) drill larger holes - I could only go up to 10mm as none of my drills will take a larger bit and then had to ream the holes to about 11mm which was hard work enough... Meh!

Anyway, it's finished bar the water connections... probably just hose clip the water pipe for this first brew directly onto the copper pipe stubs.

So here's a few piccies and even though it's an hour before what is typically, "aperitif" time I'm off to crack open a cold Perlenbacher!

After ageing several months fitting the support bars to my copper coil, I began assembling the rest of the wort chiller. My design idea was to have a stable base that is a part of the coolant circuit but avoid any contact with the hop filter in the bottom of the brewing boiler/copper.

Some bits of pipe badly soldered together.
After countless hours of plumbing during the renovation of our house I have become reasonably good at soldering. Maybe not the best looking soldering but 99% leak free, which is nice.

The base unit joined up with the cooling coil, note the bend in the pipe (the bit touching the bench)...
And stood up! pretty stable so far. It's starting to look like a wort chiller.
If you noticed the bend/kink in the base pipework in the last but one photo, it's there to bridge the hop filter that is fitted into the base of my brewing boiler/copper without touching it and possibly blocking some holes. You can see it doing its thing below.

Wort chiller base avoiding contact with the hop filter (centre)
All in all this has been the toughest project to date in the building of my brewing equipment but for me the benefits of full mashed, all grain home brewed beer makes it worth it. Having a plumber mate has certainly helped keep the cost down and I reckon the whole wort chiller has cost less than 30 quid.

My home made, immersion wort chiller in place in my brewing boiler.
If you missed it you can follow this link for Part 1 of building my own wort chiller.

Home made Beer Wort Chiller

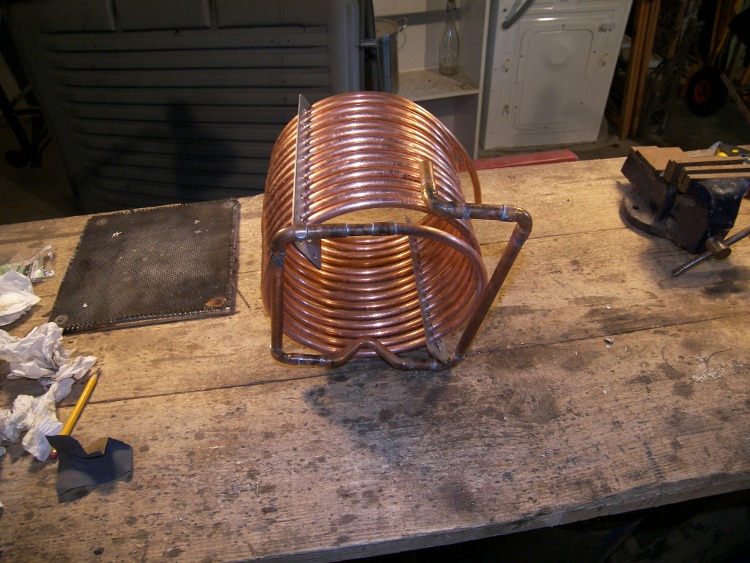
Copper pipe coiled and ready to fit to a base unit designed to support the wort chiller in the hot, hopped wort. Note the kink in the centre of the base, rear (left of pic)? That's there to clear the hop strainer in the base of my brewing copper (boiler).
Further to my post yesterday I have a few photos taken during the building of my immersion chiller. Quick re-cap the chiller is used to rapidly cool the boiled wort with bittering hops and later aroma hops to a temperature suitable for pitching (adding) the yeast. If the wort is too hot it will simply kill the yeast.

At one time the hot wort was allowed to cool overnight but this is:

a) very slow
b) a long time to leave the vulnerable liquid exposed to possible contamination

An immersion wort chiller is a simple coil of copper tubing that is placed in the hopped wort in the boiler a few minutes before the end of the boil (this sterilizes the tubing). Once the boil stage is finished, cold water is pumped through the chiller and a simple heat exchange takes place, the cold water is heated as it removes the heat from the hot, hopped wort. This can be quite a wasteful process so I am keen to develop it to use the minimum water and also a way to somehow re-use it - possibly pumped from one storage vessel to another via the copper coil and back again the next time it's used.

The initial hot water outflow from the chiller can be used for washing equipment.

My first, "worry" was how to bend the copper coil with a diameter larger than my boiler to a size small enough to fit in the boiler and also miss the pipework that acts as a hop filter... Hmmmm, I tried bending the end of the tube by hand but it seemed rock solid and considering it's meant to be "soft" it didn't seem so... bugger!

Base support for my home made Immersion Wort Chiller. The fatter pipe in the base is the hop filter leading to the external valve. I wanted to design a chiller base that would happily sit securely on the base of the boiler without interfering with the hop filter.
While I pondered how to bend the copper pipe neatly and without kinking it I began knocking up the base shown above.

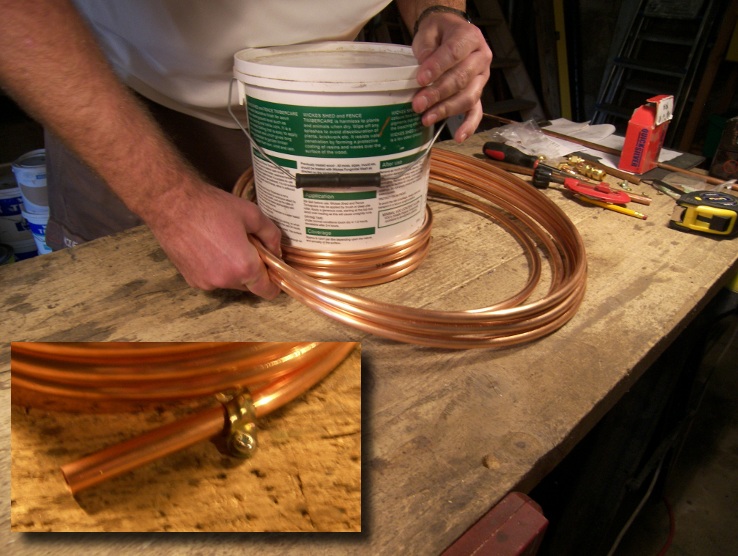
I could delay no longer and had to at least try to bend the coil and so, in a moment of clear thinking, I screwed a 10mm pipe clip over the bottom end of the coil to stop the coil moving. I then placed a very technical tin of fence treatment in the coil and began to turn the coil, easing the part in contact with the tin around a bit at a time as shown below. (inset pic shows the support fix to the bench)

Bending the copper pipe. The first coil was hardest to do as the tin kept trying to move, after that the first, new coil actually holds the tin in place and helps a great deal.
All in all it took about 5 or 6 minutes to bend the coil. At first it was quite aukward as pulling the pipe around the tin was making the tin move. After the first coil had wrapped around the tin though it held it in place and the rest followed quite easily. I was very surprised at how easy it was, I was expecting it to be a total pig and this is something I've been putting off doing for that reason.

<rawhide>Coiling, coiling, coiling. Keep that copper coiling!</rawhide>
After a few minutes this is what I ended up with. Niiiiice.


The bottom pipe will solder onto the base I made and the top will connect to either the outflow to waste or inflow from the cooling source. I am undecided as yet which way to run the chiller. Some brewers say cold in at the bottom, hot out at the top. Others say the opposite. At the end of the day it can run either way so I think I'll just do both and see which gives best results.

Almost finished. The upright facing elbow at the rear, right of the base will have along pipe attached for the water supply to connect to.
Looking at how the copper pipe collapses back down onto itself in a tight coil I think I might get some stainless steel strips, or aluminium and drill 11mm holes spaced evenly. thread the tub through the vertical, drilled strips and they'll space the copper tubing allowing a greater surface area of contact with the hot, hopped wort.

I am just about to go and finish the chiller off so there should be an update later today.

Follow the link for PART 2 of building my own wort chiller.

Wednesday, July 27, 2011

Copper Coil for Wort Chiller arrived!!!

Yay! The 5m length of copper coil I ordered from my plumber friend, Christophe for making my wort chiller arrived yesterday afternoon. Even better though, the 5m I ordered turned out to be 10m, for the same price!!!

Of course it was only polite invite Christophe in for a beer or two. His wife turned up at 8 looking for him.

I've unpacked it this morning and even though it is meant to be soft it still feels very rigid and I think it's going to give me some problems trying to coil it into a narrower diameter, taller coil. As it is it's slightly too wide to fit my wort boiler. I might have to enlist Christophe further to help with bending the tubing, he's got a van full of plumbing goodies including various bending jigs, former and tools.

More soon, with pics.

[EDIT] The pipe bent very easily. I'll do a proper update tomorrow with some photos!

Tuesday, July 26, 2011

Building My Brewery In The Barn

Our barn with entrance to the right. The mezzanine floor where the brewery is to be built is to the left. The opening at the left hand side of this picture is the access to our wood store that is underneath it.
We are fortunate with the house we bought in France in that there is a large barn built onto the main house with a nice, mezzanine floor.

Until a few days ago the mezzanine has mostly been a dumping ground for accumulated bits and bobs so I began tidying it up.

My plan to to build an enclosed area with a simple, lightweight roof up on the mezzanine. I think I can comfortably end up with a 12' x 8' area that should be plenty for the brewery, storage and fermentation cupboard.

I'll need to run a cold water feed which isn't a problem and the barn is already supplied with mains electricity.

The floor of the mezzanine is wood beams packed with slats and about 3" of hard clay. Above this (screwed down to the wooden beams) is a chipboard floor that we fitted 3 or 4 years ago.

Steps up to the mezzanine floor.
I've roughly laid out the area on the cleared space and made a start on building up the floor with 2" PU foam underneath in one corner as shown below.

Insulated base of the fermenting cupboard.
This is to form the base of the fermenting cupboard. By the time the box is built and insulated I hope it can be kept at around 20C without any heating (possibly a small electric heater set low if I brew in the winter) to avoid having to move 23litres+ of beer... for "move" see, down steps!

Above the insulation is 18mm of chipboard. Once the cupboard is built I think I'll line it with something easily washable, either lino or maybe some plastic lambris - I forget what it's called in English.

The insulated fermenting cupboard base.
Above the fermenting cupboard will be some work space and shelves. To the right of the cupboard probably with a semi dividing wall will be the brewing kit. I have an old, barely used steel mezzanine bed frame that we bought when we first moved here (we planned to run a B&B which was fine the first two years but then we had a spate of weird/obnoxious guests and said, "F**k it!".) that I plan to modify into a stepped gantry for the Hot Liquor Tank, Mash Tun & Wort Boiler/Copper.

The copper will empty to the fermenting vessel at floor level. I found a couple of wheeled dollies that will nicely take a standard fermenting bin and help with moving the filled fermenter over to the fermenting cupboard.

This is going to be a work in progress for some time, budget is a factor so I am trying to make as much as I can with various bits left over from our other projects during the renovation of the properties.

Watch this space for part two...

Monday, July 25, 2011

Beer Wort Chiller - Copper Coil Ordered

Immersion Type Beer Wort Chiller used in Full Grain Brewing

After a lot of looking for a 5 metre coil of 10mm copper pipe and getting disillusioned with a) the price and (b) the rarity of 10mm coils my mate and neighbour, Christophe has got back to me with a quote for the beast at just under 18 euros!!! That's a fair bit more than half of the price I've seen elsewhere.

It turns out his Dad is a plumber who does a lot of brewery fitting! Niiiiice :)

So, the last of my equipment items should be ready within a few hours of it arriving. The design itself is very simple. Cold water passes through the copper coil which is immersed in the hot wort (the unfermented beer, the result of mashing and sparging the malted grains) and lowers the temperature from just below boiling to around 20C so that the yeast can be added.

Add the yeast to the wort when it's hot and it'll kill it.

The wort can be allowed to cool naturally but it can take up to 24 hours which is along time for the (at this stage) very delicate beer to possibly end up in contact with nasties that can easily ruin the whole batch of beer.

So, cool the wort quick, get the yeast in and get it covered!

However, as is my way, I've been toying with another way of doing it...

In order to bring the temperature of the wort from 100C to around 30C requires, on average, the cold water passing through the immersion chiller for upwards of 20-30 minutes. This is along time to have a cold tap running. the initial water exiting the chiller is hot, the transferred heat from the wort the chiller is immersed in, and can be used for washing equipment etc but only a few gallons.

It seems to me in this day of sustaining resources and increasing utility bills, an awful waste of water. I suppose water butts for the garden could be filled but we have a well*so our gardening water is free, no need to run a tap.

I thought instead, what if I pass the hot wort through the coil (rather than the cold water) and instead of immersing the coil in my copper/boiler I immerse it in a large bucket of cold water. Large enough to hold a decent volume of water so it doesn't warm up quickly and also large enough to have a series of frozen 2litre bottles of water placed in to keep re-chilling the surrounding water.... It might just work dammit!

When used the traditional way, the immersion chiller is placed into the boiling wort ten minutes or so before the end of boil to sterilize it. in my case this would be lacking so I would have to sterilize the coil in a large pan of boiling water first. In my case, only the inside of the pipe would be in contact with the hot wort so to be safe, first I'll sit it in a bath of liquid sterilizer, give it a good rinse then boil it.

Just got to wait for the dagnamming thing to arrive now.

*Although we have a well, I have not had the water tested. It smells a bit rough when first pumped out so I don't fancy risking using it anywhere near my beer... Just in case you were thinking I could pump well water (very cold) through my chiller.

Saturday, July 9, 2011

Building My First Home Brewing Boiler

10th July - I have amended some details. See this post re grist filter & hop strainer

For brewing using the full, malted grain and hops method we need hot water and quite a lot of it. Not only that but after the wort (the raw unfermented beer if you like) has been mashed and sparged (see my post about building my first mash tun) it is then brought back up to the boil (the boiler becoming the copper) before the bittering hops and later, the aroma hops and any other adjuncts are added.

For my first foray into the world of full grain homebrewing I shall be heating my boiler simply using a gas burner. Although I see how much more practical it is to have a heating element within the boiler itself I can see that bringing a large volume of water to temperature and sustaining it at a rolling boil for an hour or more would be quite costly on the old leccy bill... I haven't dismissed it and my plan is to ultimately work a heater into this setup, but for now...

34l (7.5 gallons-ish) stock pot with a nice fitting lid
Tank connector
Valve - to act as my tap
14mm (note: I may increase the size of this*) copper pipe
5x 14mm 90deg elbows
1x 14mm T
2x silicon fairy cake moulds LOL - I cut the bases out to make two heat resistant washers to seal the valve fitting.

Tools:
Pipe cutter - you can use a hack saw but you might have to file the rough edges.
Hand drill
Pedestal drill
Spanner (for tightening the valve against the wall of the boiler)
3mm drill bit
10mm drill bit
Steel reamer (I haven't got a drill bit large enough to drill the stock pot wall to 20mm for the valve/tank connector)
Steel countersink bit
PTFE tape, for the valve to seal onto the tank connector pipe - it leaked like a bugger during my mash tun building.
Hand vice, not sure what it's really called but you clamp the pipe in it when drilling the drain holes.
Center punch
Flat file
Round file
Wire wool

*I decided that I'd like the internal plumbing to be interchangable - the 14mm piping set up can be removed and swapped for a larger bore 18mm single pipe with larger diameter holes drilled. Why? To my thinking the initial boil is just fresh water and from the boiler to the mash tun we need to get the hot water in there quickly hence the 18mm large hole piping. However, after mashing comes the sparging which requires a slower flow (yes I suppose it can be controlled by the valves but the ones I have are a little bit ON or OFF with even the halfway cracked point being virtually off.) and then after boiling the wort and adding hops the brew need transferring to the fermenting vessel and one thing I remember about brewing from kits in the past is that if the brew flows fast you quickly end up with a frothy mess that you have to wait ages for to settle. I want it to be fairly quick process all in all.


10mm hole drilled in my brewing boiler
My first task was to drill the boiler wall for fitting the valve.

Not having a drill bit larger than 14mm and needing a hole size of at least 20mm, I had to first drill a 3mm pilot hole, then up it to 10mm so I could get my reamer in and then carefully ream out the hole until the tank connector (threaded brass pipe) could turn in.

I purposely wanted it tight to aid with the seal as much as possible.

The reaming was quite a steady job, it's easy to go too fast and end up with an oval hole... this is a bad thing.

Reaming the hole up to 20mm for the tank connector
Next came the fitting of the tank connector and valve. I had pondered about how to seal this without using rubber washers as surely they could impart some dodgy flavourings/smells (this I don't know for sure so please do comment if you know) and I wasn't sure they'd stand up to the heat for long.

With perfect timing I stumbled upon a thread on the superb Jim's Beer Kit forum about using cut up silicon baking sheets to use as heat resistant washers! Genius!!!

Rather than risk the wrath of the current wife by chopping up one of her sheets, I nicked 2 silicon fairy cake cases and legged it to the workshop.

With a little scissor action you too can ruin 2 perfectly good fairy cake cases.
The result was surprisingly <bil-and-ted>most excellent dude!</bill-and-ted> the locking nut on the inside tightened up and pulled the valve assembly tightly against the wall superbly. I did use a silicon washer inside and out - although theoretically there should be no need to use one on the outside. All my life when it has involved water or liquids and plumbing I have been plagued by leaks so, f**k it! 2 washers.

The valve fitted and sealed with a fairy cake case washer.
Some text here to stop the next picture shooting up to the top of this post... WTF!!!

Inside sealed up lavverly jabberly!
Right, now comes the fiddly bit... The filter. Using the 14mm elbows, T and pipe make the following device.

14mm Copper Pipe Filter for Homebrewing Brew Boiler (undrilled)
The sizes above are to fit, as you'll see below, into my 34l stock pot. Maybe it's a bit over the top but I basically wanted a low level drain that would sit on the floor of the brewing boiler. The fact the tap is about 80mm up the side of the boiler means I needed some way of getting the liquid below that level out.

The filter (undrilled) fitted into the base of the brewing boiler
Also, come the time it has boiled wort (I will gradually learn the real terms for these things) and hops in there I want as many exit holes as possible to avoid blockages when draining it to the fermentation vessel.

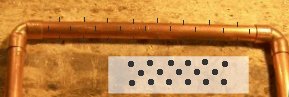
Now comes the really tedious bit, drilling the drain holes. Lot's of them. I marked the visible parts of each pipe ie the bits that aren't pushed into the elbow and T fittings 10mm apart and then turn the pipe 1/4 turn and marked again at 10mm points but staggered between the first marks as shown rather badly below...
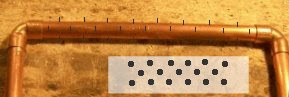
The rather grotty drawing shows markings for the staggered holes, if the pipe were rolled out flat.
Once all your pipes are marked - NOTE you only have to mark twice as detailed above because when you drill it, the bit will pass through the pipe and take care of the opposite sides anyway - take a center punch and tap each mark - this will stop the drill bit dancing around all over the surface of the pipe when you begin drilling the holes... lots of holes... oh my God so many holes!

Center punch the marked pipes ready for drilling.
So many holes :( Now, using a 3mm bit drill all those holes. it'll be as rough as hell no doubt and be careful handling the drilled pipes. Look out for burrs and rough edges.

HANDY HINT ALERT!!!

Use a steel countersink to de-burr the copper pipe. It not only takes the sharp edges off, it gives a nice looking bevel to the edge of the hole too. {applause} Thank you very much, I'm here all week!

After several months of drilling, de-burring, filing the inside burrs off with a round file and finally finishing with steel wool you'll have something a little like these.

Holey, shiny copper pipes Batman!
And finally as this epic ramble draws to a close, fit it all together and hey presto...


As I mentioned towards the start of this post I am also making a larger bore (no not me) version using 18mm pipe.

Still to do with this device:

Fit a thermometer - I want one of those groovy looking, steampunk dial types that stick out of the front like weird looking eye clock thing.

Fit a heater... maybe. We'll see what gas bill/electric bill comparisons are like.

Fit a graded sight glass thing for use during the liquor (water) boiling so I can see the liquid level without having to take the lid off and accurately dispense the hot liquor when mashing and sparging.